Auto Triage#
The CSIRT Plan provides an "Auto Triage Feature" that automatically sets the priority for handling vulnerabilities and the status of tasks.
- SSVC-based Auto Triage using a decision tree
- Special Alert Tags to set priorities for specified vulnerabilities
- Automatic Vulnerability Priority to set vulnerability priorities based on rules
- Automatic Ignore Settings to hide tasks based on rules
- Task Priority Rule Sets to set task priorities based on rules
The timing of each feature's application and the overall workflow are as follows.
flowchart TD
    A["Scan Execution /<br>Vulnerability Detection"] --> B["Automatic Vulnerability Priority<br>Automatically sets vulnerability priority based on rules"]
    A --> C["Automatic Ignore Settings<br>Automatically ignores NEW tasks that meet conditions"]
    A --> D["SSVC Priority Derivation"]
    D --> E["SSVC Triggers & Actions<br>Automatically sets status,<br>priority, and due dates"]
    A --> F["Task Priority Rule Sets<br>Automatically sets task priority per role"]
    G["Special Alert Tags"] -.->|"Applied immediately<br>upon registration/change"| H["Forcibly sets vulnerability<br>priority<br>(Cannot be changed afterward)"]
For details on priorities and override rules, please refer to "Priorities".
SSVC-based Auto Triage#
With the auto triage feature using "SSVC", you can define "actions to execute when the SSVC Priority derived during a scan differs from the previous one."
For example, if the SSVC Priority is newly determined to be immediate or out of cycle, which are high priorities, the task status can be automatically reverted to new. new tasks are categorized under the "Open" status in the sub-menus of the vulnerability and task lists, making them easy to identify as tasks that need re-triage.
For tasks determined to have a low priority, such as scheduled or defer, you can automatically set the task status to defer or risk_accepted.
Additionally, task priority and task due dates can be set at the same time.
For detailed configuration methods, please refer to "Triggers & Actions".
Special Alert Tags#
You can forcibly set the priority for specified vulnerability information. Alert tags are managed at the organization level.
Even if a priority has already been set for a vulnerability, it will be overwritten when a Special Alert Tag is added, and you will no longer be able to change the vulnerability priority manually or through Automatic Vulnerability Priority.
Special Alert Tags are managed from "Organization Settings" > "Special Alert Tag".
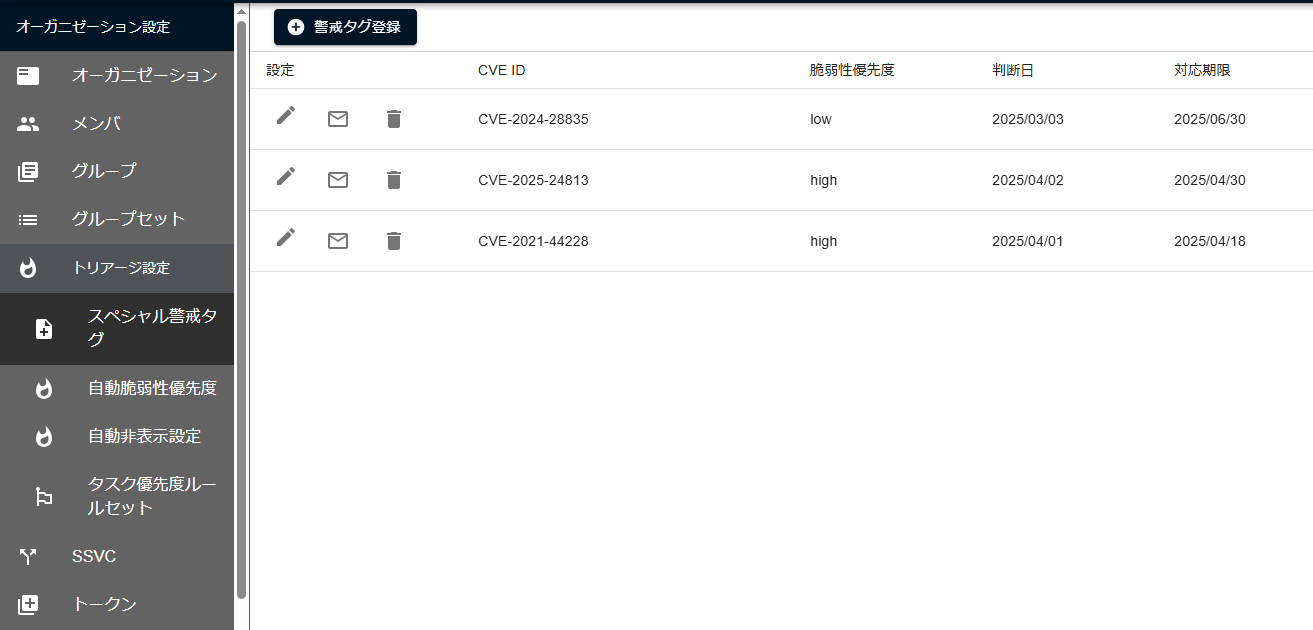
You can register a Special Alert Tag from the "Add Alert Tag" button. "Decision Date" is required when you register or edit a tag. "Due Date" is optional; if you leave it empty, there is no due date.
Existing due dates of 1970-01-01
For Special Alert Tags whose due date is already 1970-01-01, the due date appears empty in the edit dialog. If you change the Decision Date or another field and save the tag again, the due date is cleared, including the due dates of related tasks.
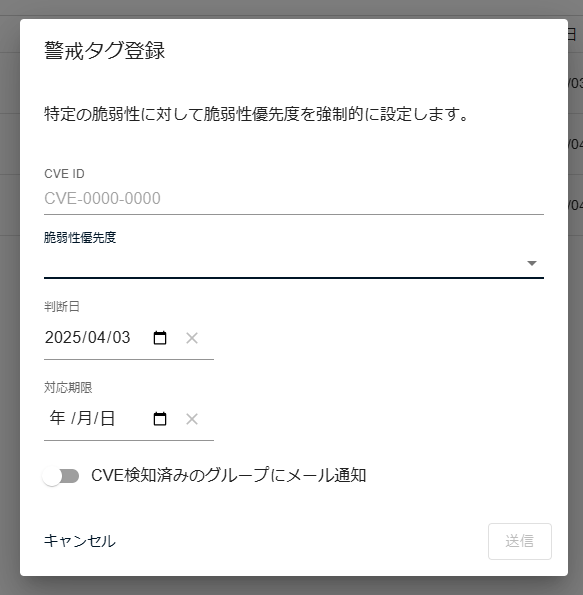
By turning on the "Send an email to the groups where this CVE was detected" checkbox, you can send email notifications to members belonging to the organization. To reduce noise, email notifications are not sent to members of groups that have not detected the target vulnerability.
You can resend the email notification from the "Resend Notification" button.

Conditions Available in Automatic Settings#
"Automatic Vulnerability Priority", "Automatic Ignore Settings", and "Task Priority Rule Sets" all specify rule conditions using a common set of items. For details on each item, refer to "Important CVE Conditions". Note, however, that the available values and the direction of evaluation differ by feature.
| Item | Description | Differences by feature |
|---|---|---|
| SSVC Priority | Specify immediate or out of cycle |
For Automatic Ignore Settings, you specify whether to target vulnerabilities whose highest SSVC Priority is defer |
| CVSS Score | Specify CVSS v2 / v3 / v4 and the scores provided by Red Hat and Microsoft For Red Hat and Microsoft scores, the highest of the v2 / v3 / v4 scores is used |
Automatic Ignore Settings includes vulnerabilities "less than the specified value", while the other two include those "greater than or equal to the specified value" |
| CVSS v3 Base Metrics | Evaluated against each CVSS v3 metric from all data sources used by FutureVuls, such as NVD and OVAL | Automatic Ignore Settings includes vulnerabilities whose severity is "at or below the specified value in every data source", while the other two include those whose severity is "at or above the specified value in any data source" |
| Reliability of published exploit code | Specify "High" or "Low" | For Automatic Ignore Settings, specify "None" or "Low" |
| Severity of published security advisories | Specify "High" or "Low" | Cannot be specified in Automatic Ignore Settings |
| Vulnerabilities with unreliable detection | Specify whether to include them in the evaluation | |
| Vulnerabilities without information on Windows patch availability | Specify whether to include them in the evaluation | |
| Server Tag | If not specified, no filtering by server tag is applied If specified, only servers that have at least one of the specified tags are targeted Case-insensitive |
For Task Priority Rule Sets, if not specified, all servers belonging to the roles linked to the rule set are targeted |
| Apply the action without conditions | Ignores all conditions and applies the action uniformly | Not available in Automatic Ignore Settings |
Automatic Vulnerability Priority#
Automatic Vulnerability Priority is a feature that automatically sets the priority of vulnerabilities based on predefined rules regarding their characteristics. Similar to the conditions for "Important CVE", you can configure detailed settings such as CVSS scores (v2 / v3 / v4) and CVSS v3 Base Metrics.
The settings are applied when a scan is executed after configuring Automatic Vulnerability Priority (this includes existing vulnerabilities).
When a vulnerability is detected on a server as a result of a scan and a new task is created, the task's priority is set based on the vulnerability priority.
For example, you can automatically set the priority to HIGH for vulnerabilities that meet the following conditions, considering them as high risk.
- Vulnerabilities where the severity of the published alert is "High" and the CVSS score is 9.0 or higher.
- Vulnerabilities that can be exploited over the network and are found on a server tagged with "Personal Information".
Configurable Items#
For the conditions you can specify, refer to "Conditions Available in Automatic Settings".
If you set "Apply the action without conditions", the vulnerability priority is set uniformly for all vulnerabilities.
When you want to specify a range for CVSS scores or Base Metrics
Rules are evaluated in descending order of their assigned priority, and the first matching rule is applied. By using this specification, you can effectively specify a range by defining rules in order from the strictest conditions.
Example: To set a MEDIUM priority for a CVSS score range of 7.0 to 8.9
HIGH: CVSS 9.0 or higherMEDIUM: CVSS 7.0 or higher
By setting the rules in this order, scores of 9.0 or higher will match the HIGH rule, so the MEDIUM rule will effectively apply to scores in the range of 7.0 ≤ score < 9.0.
Configuration Method#
- Create a rule in
Organization Settings > Auto CVE Priority. - Scan the servers.
The priority of vulnerabilities on servers scanned after the configuration will be updated. By default, each server is scanned daily, but if you want to reflect the settings immediately, please execute "Manual Scan of All Servers" in the group settings.
Automatic Ignore Settings#
This feature allows you to automatically ignore tasks based on predefined rules regarding vulnerability characteristics. When a vulnerability is detected, a task is created, but with this feature, its status is automatically changed to "Ignored" and it will no longer appear in places like "Tasks > Open". You can set multiple rules, and if any of them match, the task will be ignored (it is also possible to display them in gray by changing the default filter settings for ignored items).
Similar to the conditions for "Important CVE", you can configure detailed settings such as CVSS scores (v2 / v3 / v4) and CVSS v3 Base Metrics.
This is applied when a scan is executed after configuring the automatic ignore settings (this includes existing tasks).
Note that this is only applied to tasks with the status NEW.
Also, it is not applied to tasks with HIGH priority.
For example, vulnerabilities that meet the following conditions can be considered low risk and automatically ignored.
- Servers tagged with "Internal System"
- Not exploitable from the network
Configurable Items#
For the conditions you can specify, refer to "Conditions Available in Automatic Settings".
If you have configured automatic ignore by mistake
If you have ignored a task by mistake, please unignore it from "Tasks > All" by selecting "Unhide Tasks".
You can filter by the Hide Flag column or Last Task Update column and select "Apply to all rows matching the current filter" from the "Unhide Tasks" menu to speed up the process (Bulk Operations on All Filtered Rows).
Configuration Method#
- Create a rule in
Organization Settings > Auto Ignore Settings. - Scan the servers.
This will be applied to tasks that are scanned after the configuration (this includes existing tasks).
Task Priority Rule Sets#
This feature allows you to automatically change the priority of applicable tasks by defining rule sets in advance and linking them to roles.
It can also be used to complement SSVC, for example, by setting the task priority to HIGH for tasks with a CVSS score of "10" as a precaution, even if they do not currently fall under immediate in the SSVC decision tree.
Configurable Items#
For the conditions you can specify, refer to "Conditions Available in Automatic Settings".
If you do not specify a server tag, or if you set "Apply the action without conditions", the rule targets tasks on all servers belonging to the roles linked to the rule set.
This is applied when a scan is executed after configuring the Task Priority Rule Set.
For example, you can automatically set the priority to HIGH for tasks related to vulnerabilities that meet the following conditions, considering them as high risk.
- The severity of the published alert is "High" and the CVSS score is 9.0 or higher.
- Vulnerabilities that can be exploited over the network, do not require special privileges for attack, and have a Red Hat CVSS score of 9.0 or higher.
After creating a rule set in "Organization Settings" > "Task Priority Rule Set", link the Task Priority Rule Set to a role in the role details of each group. The task priority of each task that matches the rule set will be updated.
When you want to specify a range for CVSS scores or Base Metrics
Rules are evaluated in descending order of their assigned task priority, and the first matching rule is applied. By using this specification, you can effectively specify a range by defining rules in order from the strictest conditions.
Example: To set a MEDIUM priority for a CVSS score range of 7.0 to 8.9
HIGH: CVSS 9.0 or higherMEDIUM: CVSS 7.0 or higher
By setting the rules in this order, scores of 9.0 or higher will match the HIGH rule, so the MEDIUM rule will effectively apply to scores in the range of 7.0 ≤ score < 9.0.
Configuration Method#
- Create a rule in
Organization Settings > Task Priority Rule Set. - In the role details of each group, link the created rule to the role.
- Scan the servers.
This will be applied to tasks that are scanned after the configuration (this includes existing tasks).