WordPress Scan#
This feature automatically obtains a list of WordPress core, plugins, and themes installed on the server and can detect their vulnerabilities. It utilizes the vulnerability database from "wpscan.com," which holds information on over 20,000 WordPress-related vulnerabilities.
This feature works by having the Vuls scanner execute the wp command on the OS where WordPress is running to obtain a complete list of versions for the WordPress core, plugins, and themes.
Because detection is based on this complete list, it allows for more accurate detection than network-based scanners (which infer versions from signatures).
Furthermore, it is a non-destructive scan that does not perform simulated attacks, so it will not affect your production site.
Scope
This feature targets WordPress set up on Linux.
Configuration Method#
The following settings are required to scan WordPress.
- Obtaining a WPScan API Token and Registering it in FutureVuls
- Scanner Configuration
- Adding Configuration to sudoers on the Scan Target Server
- Executing the Scan
Hands-on Guide
A hands-on article covering the contents of this manual is available on the FutureVuls blog.
Manage WordPress Vulnerabilities! How to Detect Vulnerabilities in Core, Plugins, and Themes
Obtaining a WPScan API Token and Registering it in FutureVuls#
-
Register an account on "wpscan.com" and obtain an API Token.
-
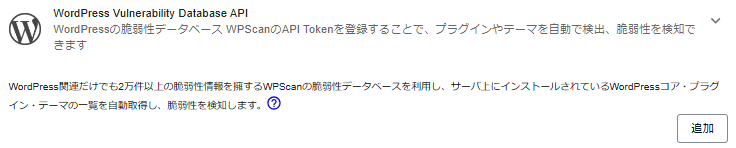
Open FutureVuls, go to Group Settings > External Integration > WordPress Vulnerability Database API, and register the API Token you just obtained.
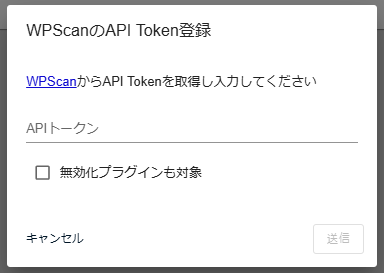
- If you check "Include Inactive Plugins," vulnerabilities in plugins and themes that are deactivated in WordPress will also be detected.
- If unchecked, only vulnerabilities in activated items will be detected.
- If you want to change the "Include Inactive Plugins" setting after registration, please delete the wpscan configuration and then re-register it.
- FutureVuls consumes 1 API call per WordPress core, plugin, or theme scanned.
- The API limit varies depending on the type of wpscan.com plan.
- If you exceed the wpscan.com API limit, a separate paid contract with wpscan.com is required.
- FutureVuls does not act as a reseller for wpscan.com. Please purchase a plan directly from wpscan.com.
Scanner Configuration#
Edit /opt/vuls-saas/config.toml.
With this configuration, both OS packages and WordPress will be scanned.
[servers]

  [servers.dev]
    user = "vuls-saas"
    host = "localhost"
    port = "local"
    scanMode = ["fast-root"]
    [servers.dev.uuids]
      dev = "xxxx-xxxx-xxxx-xxxx"

  [servers.dev.wordpress]
    cmdPath = "/usr/local/bin/wp"
    osUser = "wordpress"
    docRoot = "/home/kusanagi/wp/DocumentRoot/"
- For
cmdPath, specify the absolute path to thewpcommand.- Command to check the absolute path:
which wp
- Command to check the absolute path:
- For
osUser, specify a user who can execute thewpcommand. - For
docRoot, specify the DocumentRoot of your WordPress installation.
Adding Configuration to sudoers on the Scan Target Server#
The Vuls scanner must be able to execute the wp command on the scan target server via sudo -u <user> -i without a password.
Add the following configuration to /etc/sudoers.d/vuls-saas on the scan target server where WordPress is running.
If the user who can execute the wp command or the path is different, please modify it to match your environment.
<user> ALL=(ALL) NOPASSWD:SETENV: /bin/bash -c /usr/local/bin/wp cli *, /bin/bash -c /usr/local/bin/wp core *, /bin/bash -c /usr/local/bin/wp theme *, /bin/bash -c /usr/local/bin/wp plugin *
When the Vuls scanner is updated, /etc/sudoers.d/vuls-saas may be overwritten, which could cause an error on the next scan. Please be aware that you will need to edit /etc/sudoers.d/vuls-saas again after updating the Vuls scanner.
Executing the Scan#
To scan immediately, perform a "Manual Scan".
Scanning Only WordPress#
Edit /opt/vuls-saas/config.toml and specify scanModules = ["wordpress"].
With this configuration, OS packages will not be scanned.
[servers]

  [servers.dev]
    user = "vuls-saas"
    host = "localhost"
    port = "local"
    scanModules = ["wordpress"]
    [servers.dev.uuids]
      dev = "xxxx-xxxx-xxxx-xxxx"

  [servers.dev.wordpress]
    cmdPath = "/usr/local/bin/wp"
    osUser = "wordpress"
    docRoot = "/home/kusanagi/wp/DocumentRoot/"
Scanning Multiple WordPress Sites#
Edit /opt/vuls-saas/config.toml as follows.
[servers]

  [servers.dev]
    user = "vuls-saas"
    host = "localhost"
    port = "local"
    scanModules = ["wordpress"]
    [servers.dev.uuids]
      dev = "xxxx-xxxx-xxxx-xxxx"

  [servers.dev.wordpress]
    cmdPath = "/usr/local/bin/wp"
    osUser = "wordpress"
    docRoot = "/home/kusanagi/wp/DocumentRoot/"

  ## Assign a unique name within config.toml (here we use YYYY)
  [servers.YYYY]
    user = "vuls-saas"
    host = "localhost"
    port = "local"
    scanModules = ["wordpress"]
    ## Change the UUID to ensure it is unique
    [servers.YYYY.uuids]
      YYYY = "yyyy-yyyy-yyy-yyyy"

  ## Change to the name assigned above (YYYY)
  [servers.YYYY.wordpress]
    cmdPath = "/usr/local/bin/wp"
    osUser = "wordpress"
    docRoot = "/home/kusanagi/wp/DocumentRoot2/"
How to Manage OS Packages and WordPress as Separate Servers#
If you want to manage them as "separate servers" on the FutureVuls screen, edit /opt/vuls-saas/config.toml as follows to split the server definitions.
[servers]

  # dev is for managing OS package vulnerabilities on FutureVuls
  [servers.dev]
    user = "vuls-saas"
    host = "localhost"
    port = "local"
    [servers.dev.uuids]
      dev = "xxxx-xxxx-xxxx-xxxx"

  # ZZZZ is for WordPress
  [servers.ZZZZ]
    user = "vuls-saas"
    host = "localhost"
    port = "local"
    scanModules = ["wordpress"]
    [servers.ZZZZ.uuids]
      ZZZZ = "zzzz-zzzz-zzzz-zzzz"

  [servers.ZZZZ.wordpress]
    cmdPath = "/usr/local/bin/wp"
    osUser = "wordpress"
    docRoot = "/home/kusanagi/wp/DocumentRoot/"