Cloud One Integration#
Integration between FutureVuls and Trend Micro Cloud One is available. For information on how to integrate FutureVuls with Cloud One accounts created before August 2021, see "this document".
How to Integrate with Trend Micro Cloud One Workload Security#
By integrating with Trend Micro Cloud One Workload Security (hereafter referred to as Cloud One), you can add the following two features to FutureVuls.
Intrusion Prevention Rule Optimization#
Automatically generate Cloud One Intrusion Prevention policies based on the list of CVE-IDs detected by FutureVuls.
This generates optimized rules based on the CVE-IDs actually detected. Policies are created in Cloud One in the format [Vuls] {server_role_name}. You should organize server roles into groups that share the same policy in Cloud One. (How to create roles)
Intrusion Prevention Rule Display and Automatic Triage#
This feature displays CVE-IDs currently protected by Cloud One on the list screen and sets the status of corresponding tasks to Workaround. After installing the Cloud One agent, you must perform a new scan in FutureVuls.
Both features are executed at the time a scan is performed in FutureVuls.
As of the 2021-06-18 release, an Available status icon is now displayed if a Cloud One Intrusion Prevention rule exists for a vulnerability detected in FutureVuls.
The Available status is displayed by default, even if "Group Settings > Cloud One External Integration" is not configured. Furthermore, information on the presence of intrusion prevention rules is synchronized by the FutureVuls service every few hours.
This is a useful feature for situations where a high-risk vulnerability has been detected but cannot be patched immediately, and you want to check if a corresponding intrusion prevention rule exists in Cloud One as a temporary workaround.
Authentication Settings#
Operations in Cloud One#
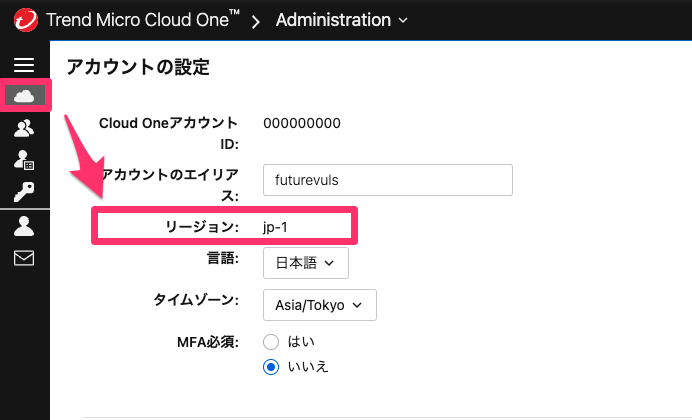
1. Confirm Region Information#
Check the region information for your Cloud One account.
2. Create a "Role" for FutureVuls#
Next, create a role under Administration > User Management > Roles.
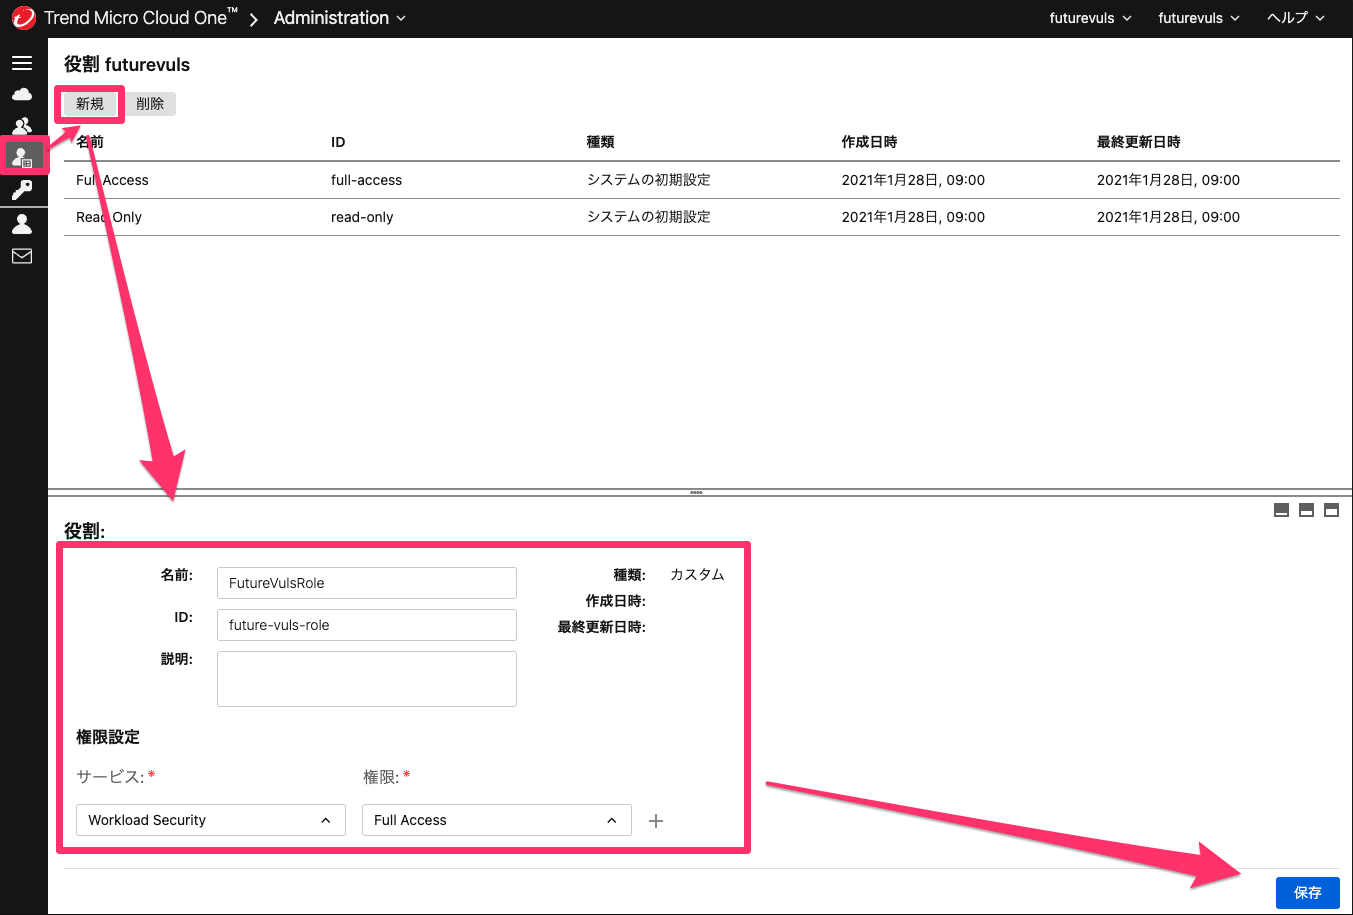
Note: To retrieve computer intrusion prevention rules, "Edit" permission for computers is required. We are currently confirming with Trend Micro whether this edit permission is necessary.
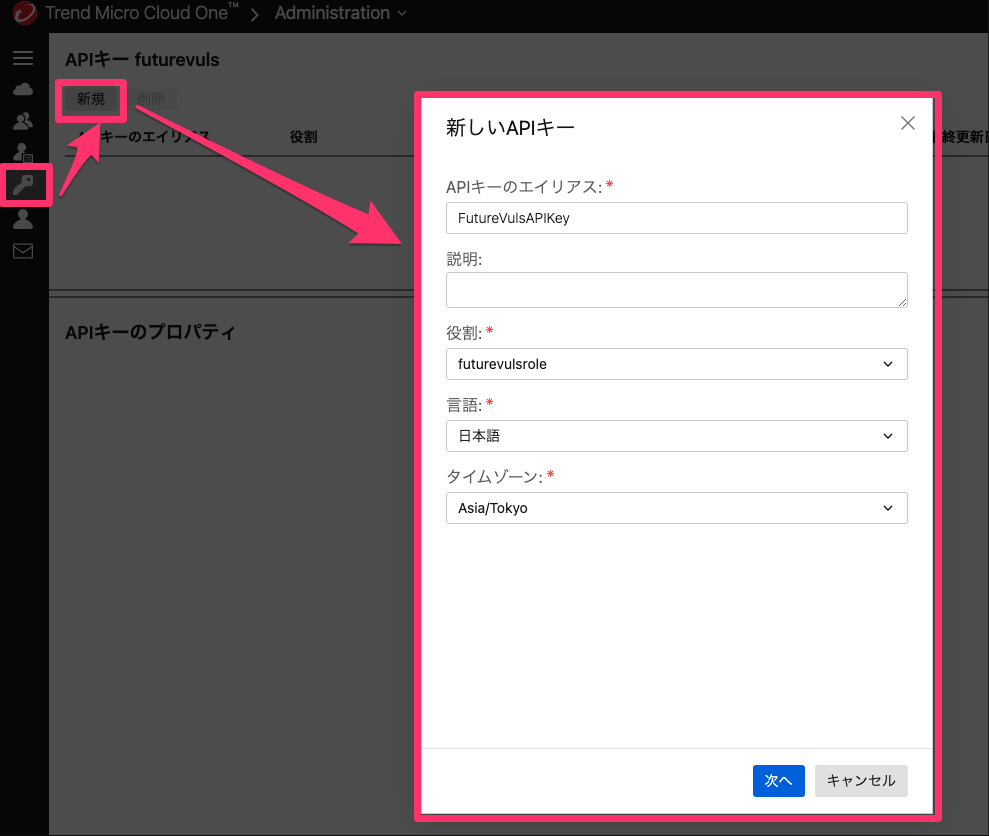
3. Issue an API Token for FutureVuls#
- Go to User Management > API Keys and select "New".
- Generate a key based on the role you just created.
- Enter the generated key and the region information confirmed earlier into the external integration screen in FutureVuls.
- Due to the Cloud One account system change in August 2021, the method for obtaining an API key differs between the new system and the legacy system.
- As explained on the official website, you can identify which system you are using by the color of the banner on the login page.
- If you are using the old Cloud One management console, you will need to obtain an API token by following the instructions on this page.
Operations in FutureVuls#
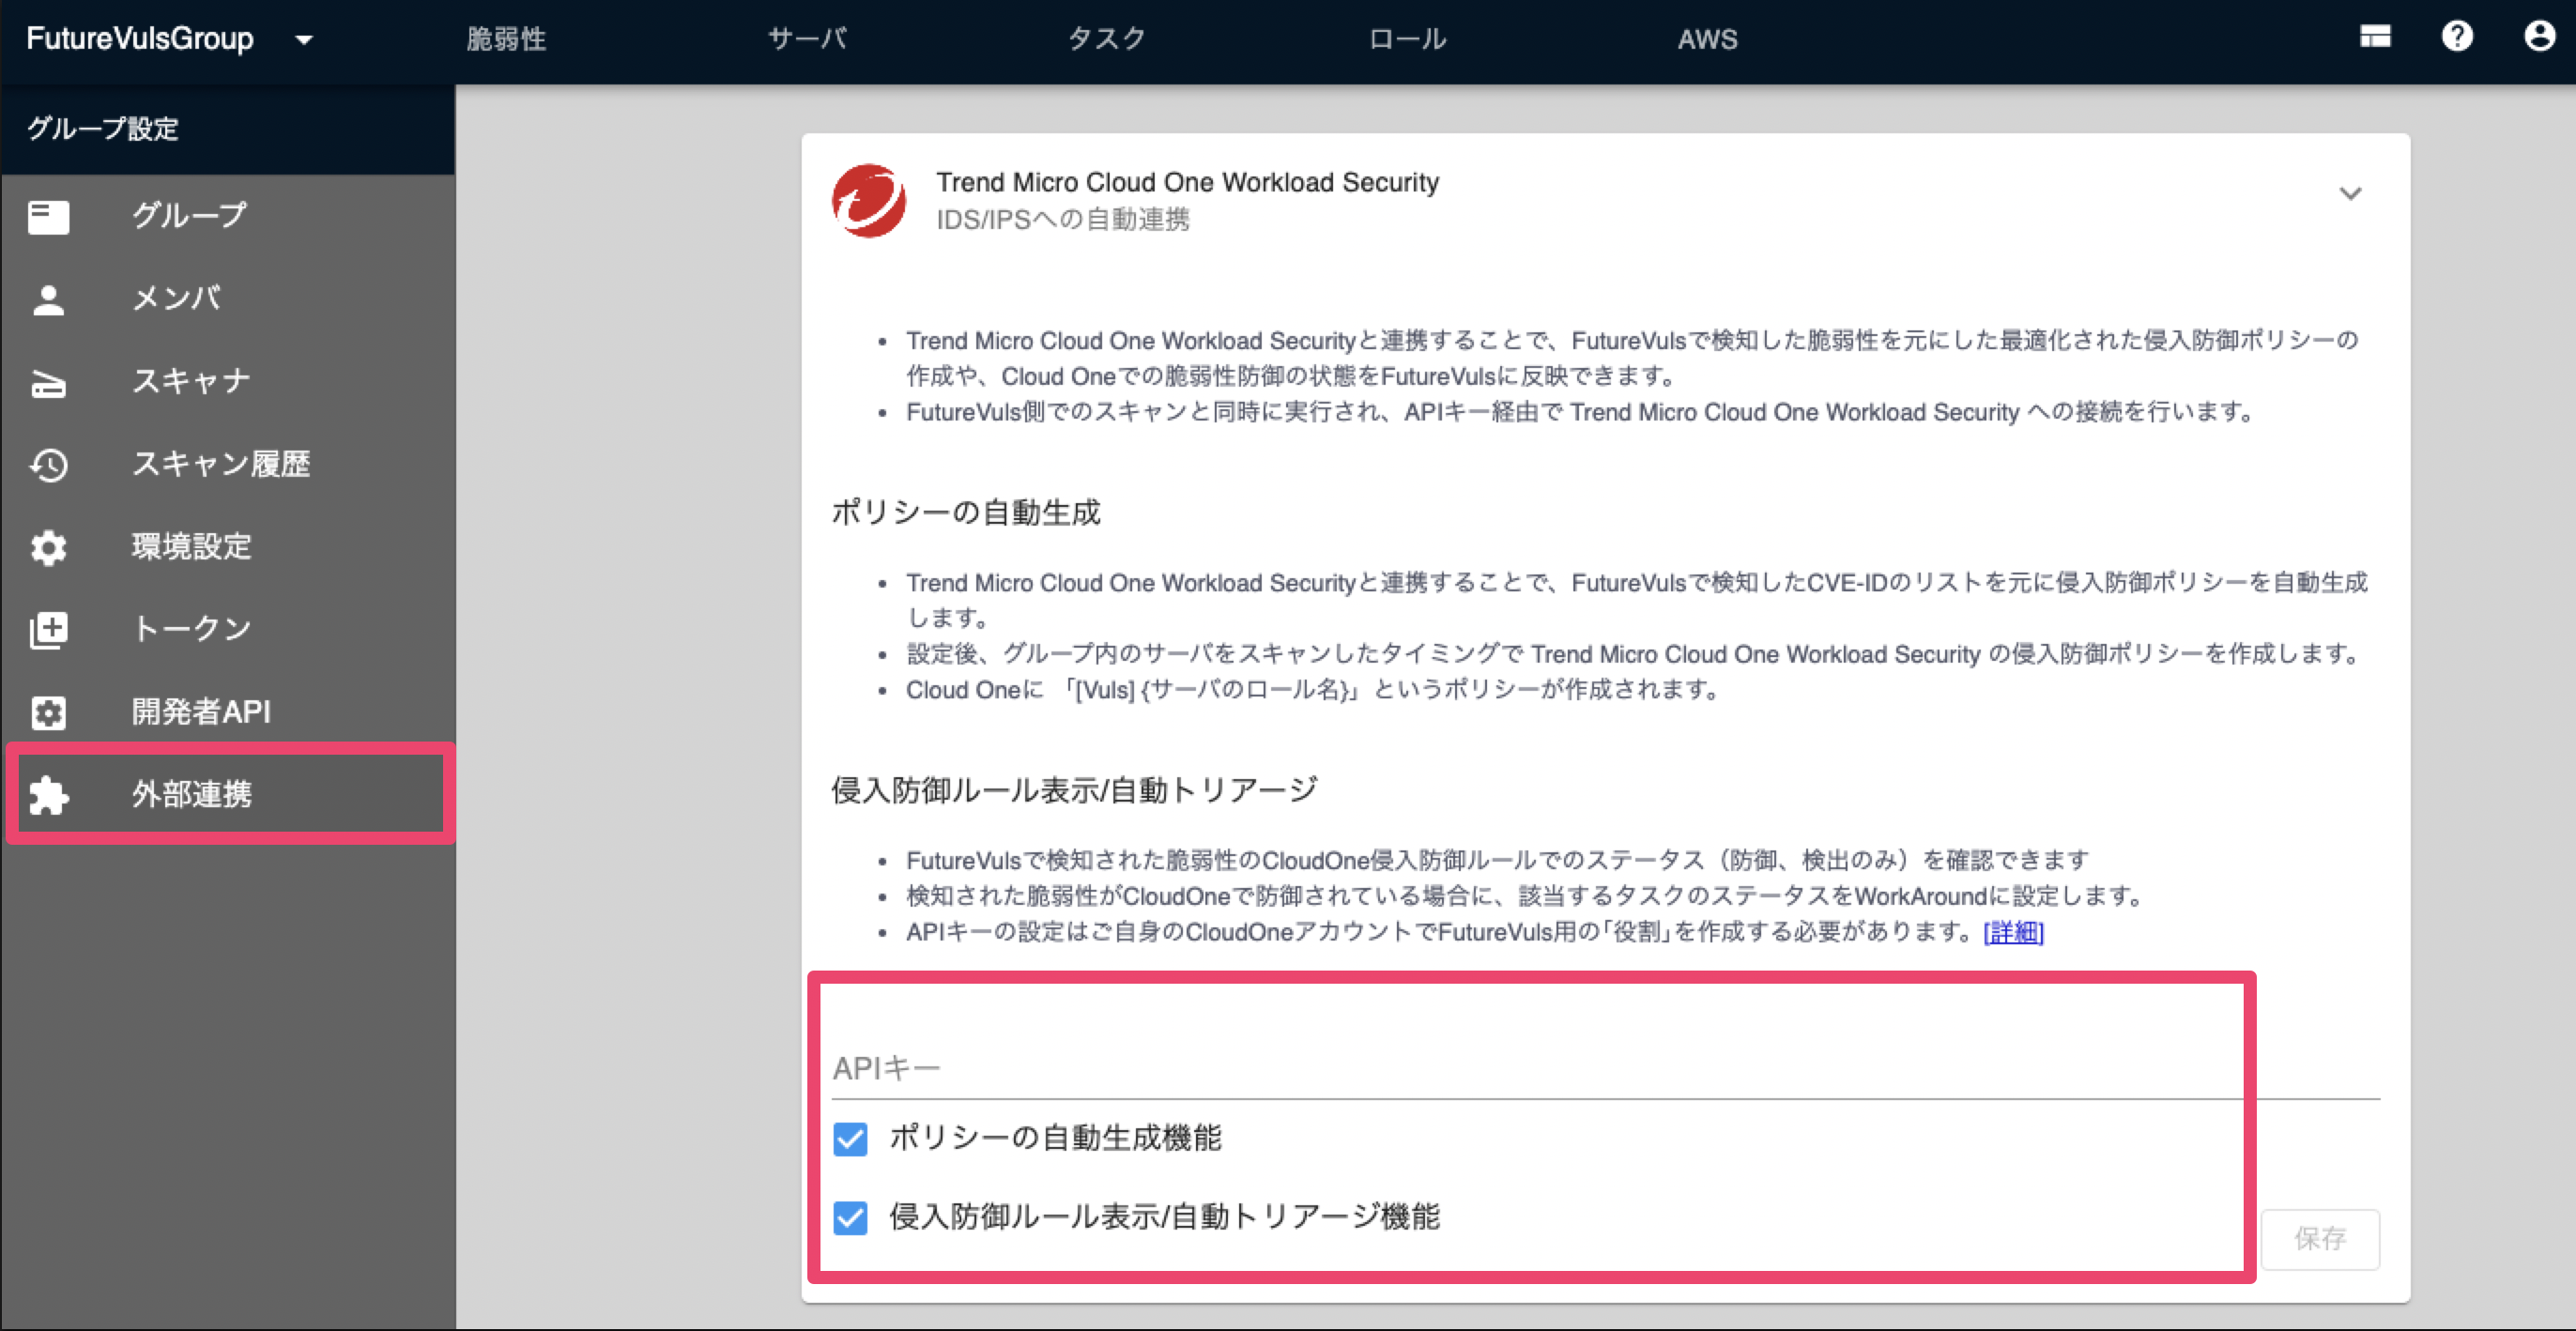
You can configure this from External Integration in the group settings.
Enter the API Token you just created and click the "Save" button.
From here, you can also configure the settings for automatic policy generation and triage.
Integration Setup#
0. Integrate on the Group Settings Screen Following the Steps Above#
1. Create a "Role" in the FutureVuls Console#
Create roles for the units you want to segment. Creating roles based on your Cloud One policy units will make management easier.
2. Create a "Policy" in the Cloud One Console#
When creating a policy, using the naming convention [Vuls] {role_name} will enable automatic updates of intrusion prevention rules.
For example, for a role named default, create a policy named [Vuls] default in Cloud One.
Note: If a policy with this name does not exist, a new policy will be created with the above naming convention.
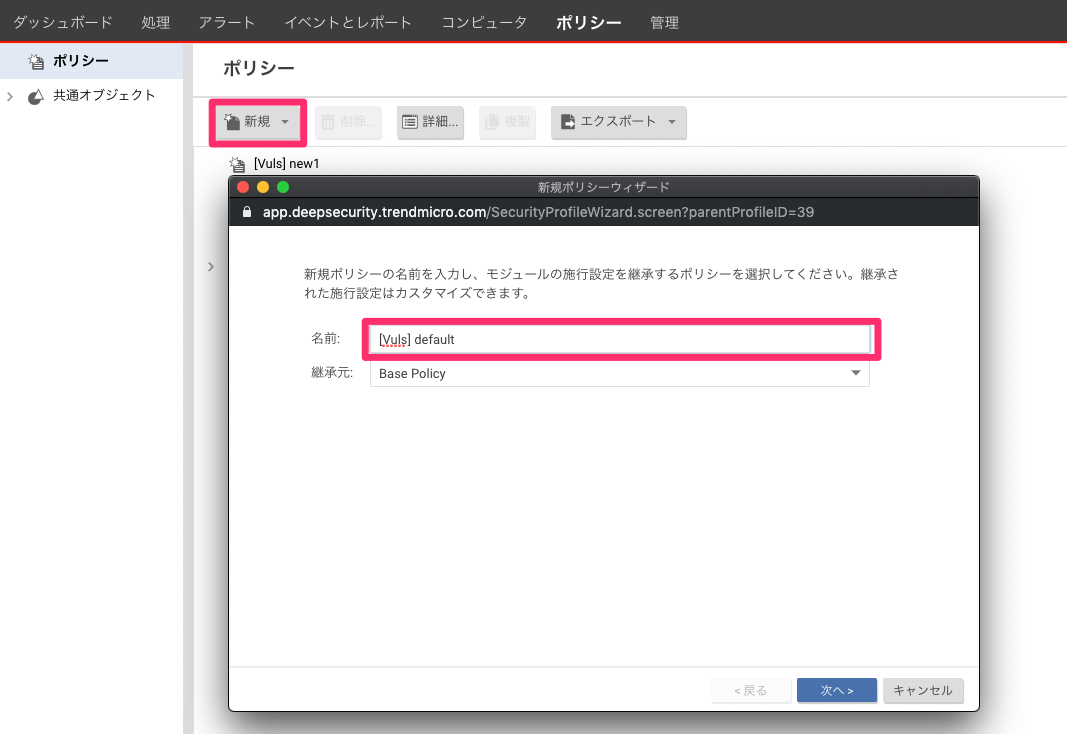
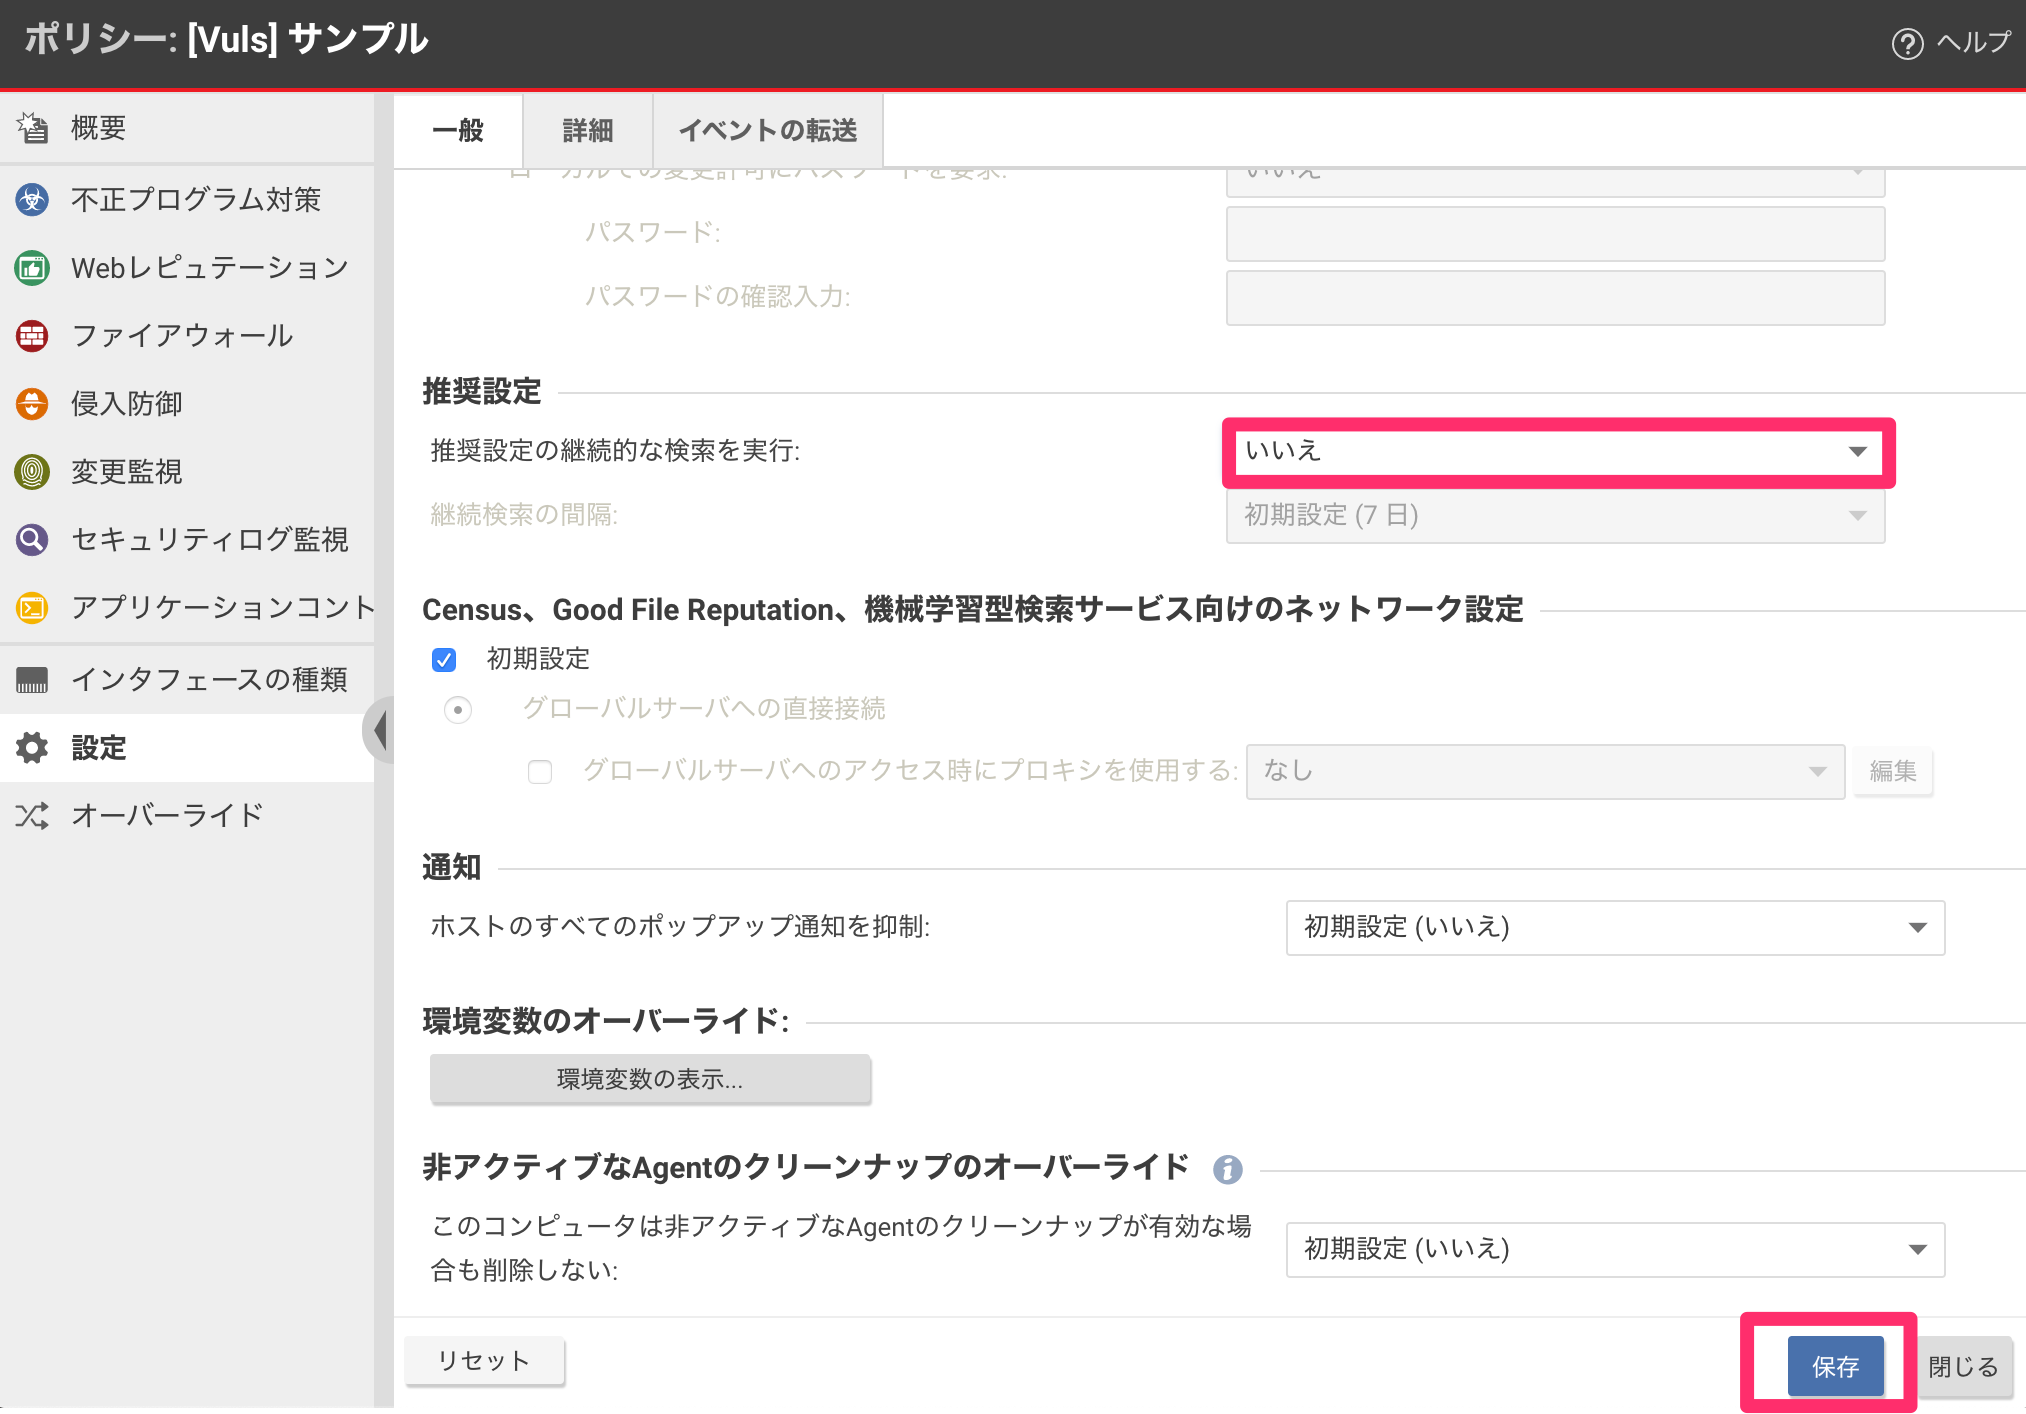
When creating a new policy, under "Settings > General > Recommendation Scans", set "Perform ongoing recommendation scans" to "Yes" or "No". Applying the intrusion prevention rules will fail if the setting is "Inherited (Yes/No)" or "Initial Setting (Yes/No)" instead of an explicit "Yes" or "No".
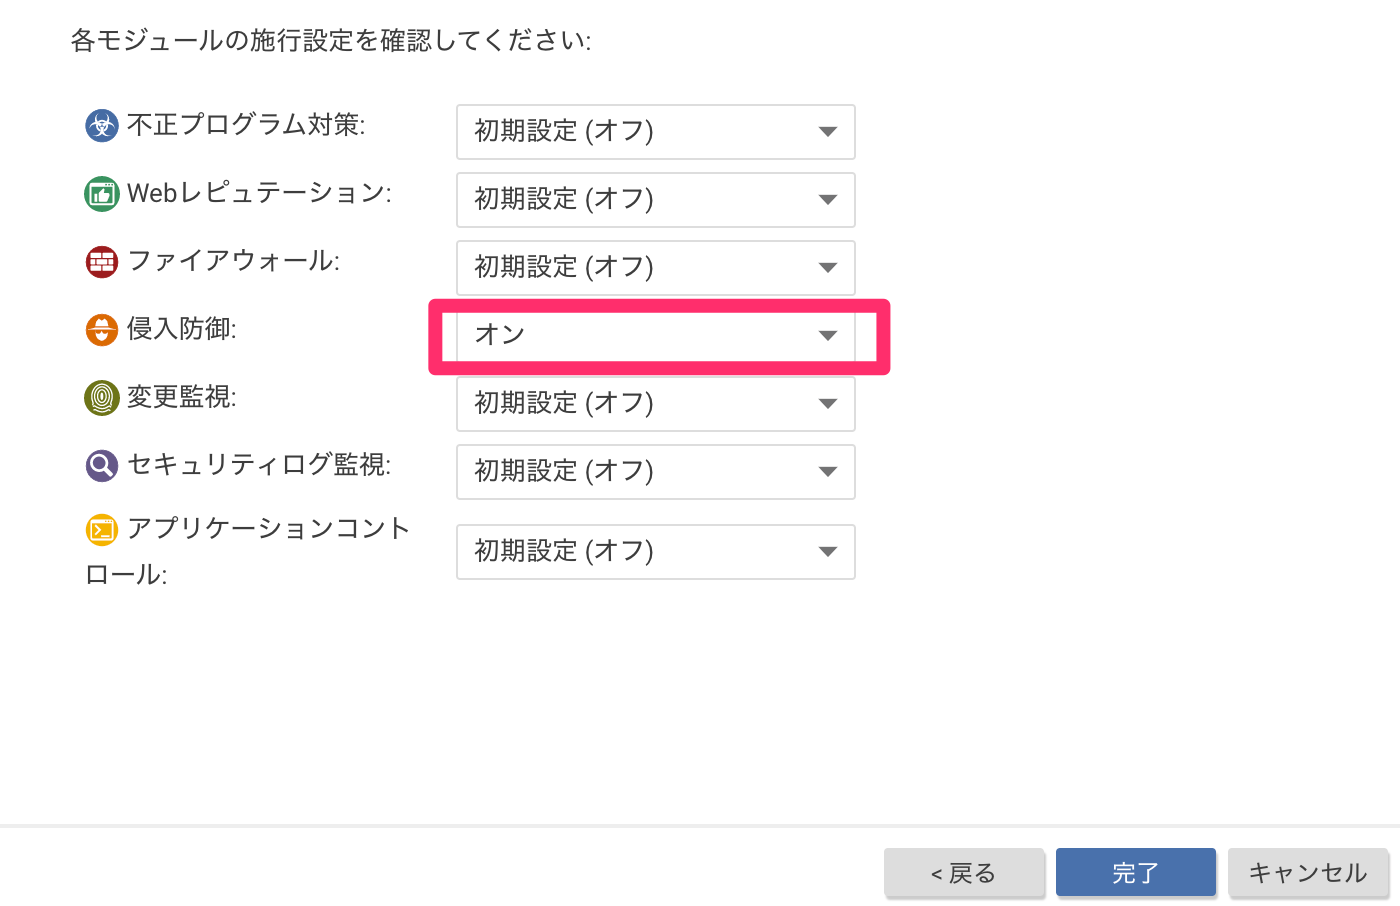
Also, set Intrusion Prevention to "On" to enable the configured rules.
3. Assign Servers to Roles in the FutureVuls Console#
On the Servers page, you can select multiple servers and change their roles in bulk.
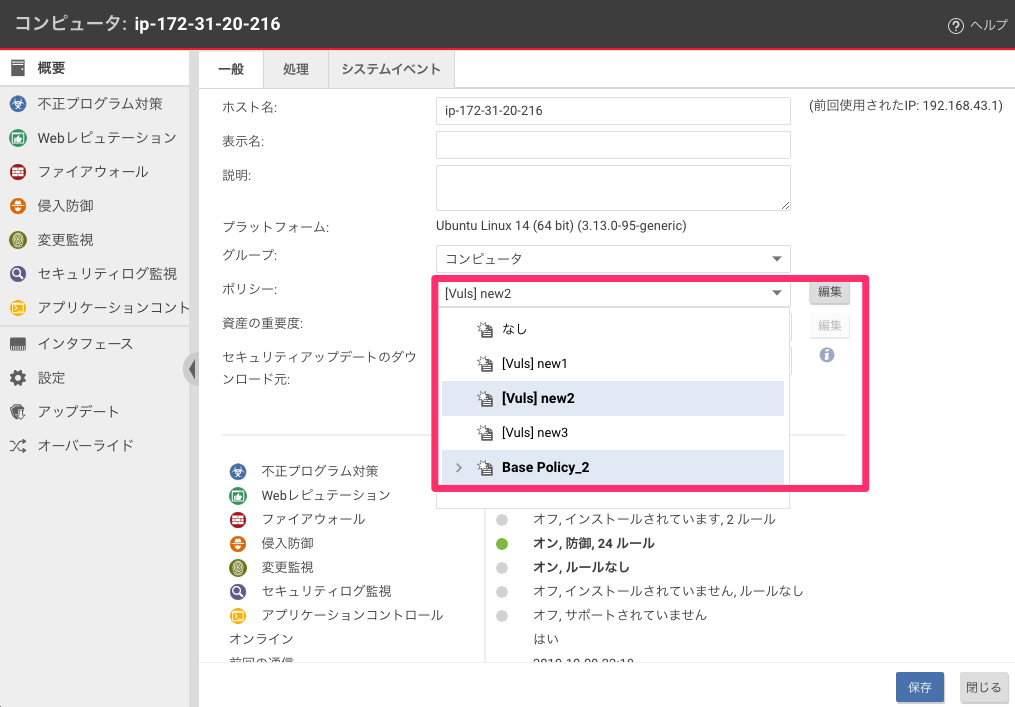
4. Assign Policies to Computers in the Cloud One Console#
5. Run a Scan#
To complete the Cloud One integration, you must run a new scan after completing the setup. It may take a few minutes for the Cloud One integration to take effect.
6. Verify the Integration#
On the server list screen, an icon will appear in the "Cloud One Status" column indicating whether the intrusion prevention rules are enabled.
On the task list screen, if the intrusion prevention rules set in Cloud One are applied, the status will be shown in the "Cloud One Status" column. The task status will also be updated accordingly.

- Protected by Cloud One: "✔" icon, task status becomes Workaround.
- Detected by Cloud One: "!" icon, task status remains unchanged.
- Intrusion Prevention Rule available: "Magnifying glass on file" icon, an intrusion prevention rule exists in Cloud One but has not been applied, so the task status remains unchanged.
If the Status Changes#
- If the status changes from Protected to Detected in Cloud One, the task status changes to New.
- If Cloud One integration is disabled, Cloud One information is deleted.
Notes#
- Currently, integration with on-premises Cloud One is not supported.
- If you disable the Cloud One integration, the status of tasks already set to Workaround by the integration will not be reverted.
Policy settings are created for each role, so to maximize the effectiveness of the integration, you need to properly manage server roles.