Scanner Installation#
This section explains how to scan servers via the Vuls scanner and automatically upload the configuration information to the cloud service. This supports the following scan methods:
- Local Scan by deploying a scanner on the target server
- Remote Scan by connecting and scanning via SSH
- Docker Scan (Trivy) for scanning container images
For both Linux and Windows, you can install the scanner by executing the displayed command.
The installation command can be found under Group Settings → Scanner.
Viewing Permissions
Only users with group administrator privileges can view the commands for installing the scanner.
The following types of scanners are available:
Proxy Settings
In FutureVuls, the scan execution server requires internet access during "scanner installation" and "scan result upload". In environments where internet access is routed through a proxy server, you must configure proxy settings after installation. For details, refer to the "Proxy Settings" section.
Installing the Linux Scanner#
Install the scanner on a Linux server to detect vulnerabilities. Find the installation command on the FutureVuls console and run it on the Linux server to install the scanner.
- The scanner installation must be run with root privileges.
- For servers behind a proxy, you must ensure curl can access the internet.
- For details, refer to the "FAQ" in the manual.
Settings Performed During Installation#
The following tasks are performed during the Linux scanner installation. The processes executed by the installer are publicly available in "this script".
Since installation runs as root, no additional password prompts will appear during the following processes.
| Process | Description |
|---|---|
| Installation of dependent software | ・RedHat, Oracle, Rocky, Alma, Fedora: yum-utils, lsof・Amazon: yum-utils, lsof, cronie・Ubuntu: debian-goodies・Debian: reboot-notifier, aptitude, debian-goodies, lsof |
| Creation of execution user and group | ・User: vuls-saas ・Group: vuls-saas |
| Creation of log directory | Creates /var/log/vuls |
| Placement of the scanner (binary) | /opt/vuls-saas/vuls |
| Placement of the execution script | /opt/vuls-saas/vuls-saas.sh |
| Placement of the configuration file | /opt/vuls-saas/config.toml |
| Configuration of sudoers | /etc/sudoers.d/vuls-saasSets access rights to specific commands for the vuls-saas user |
| Configuration of cron for scanning | Configured in /etc/cron.d/vuls-saas-scan *Runs once a day, 5 minutes after the installation time |
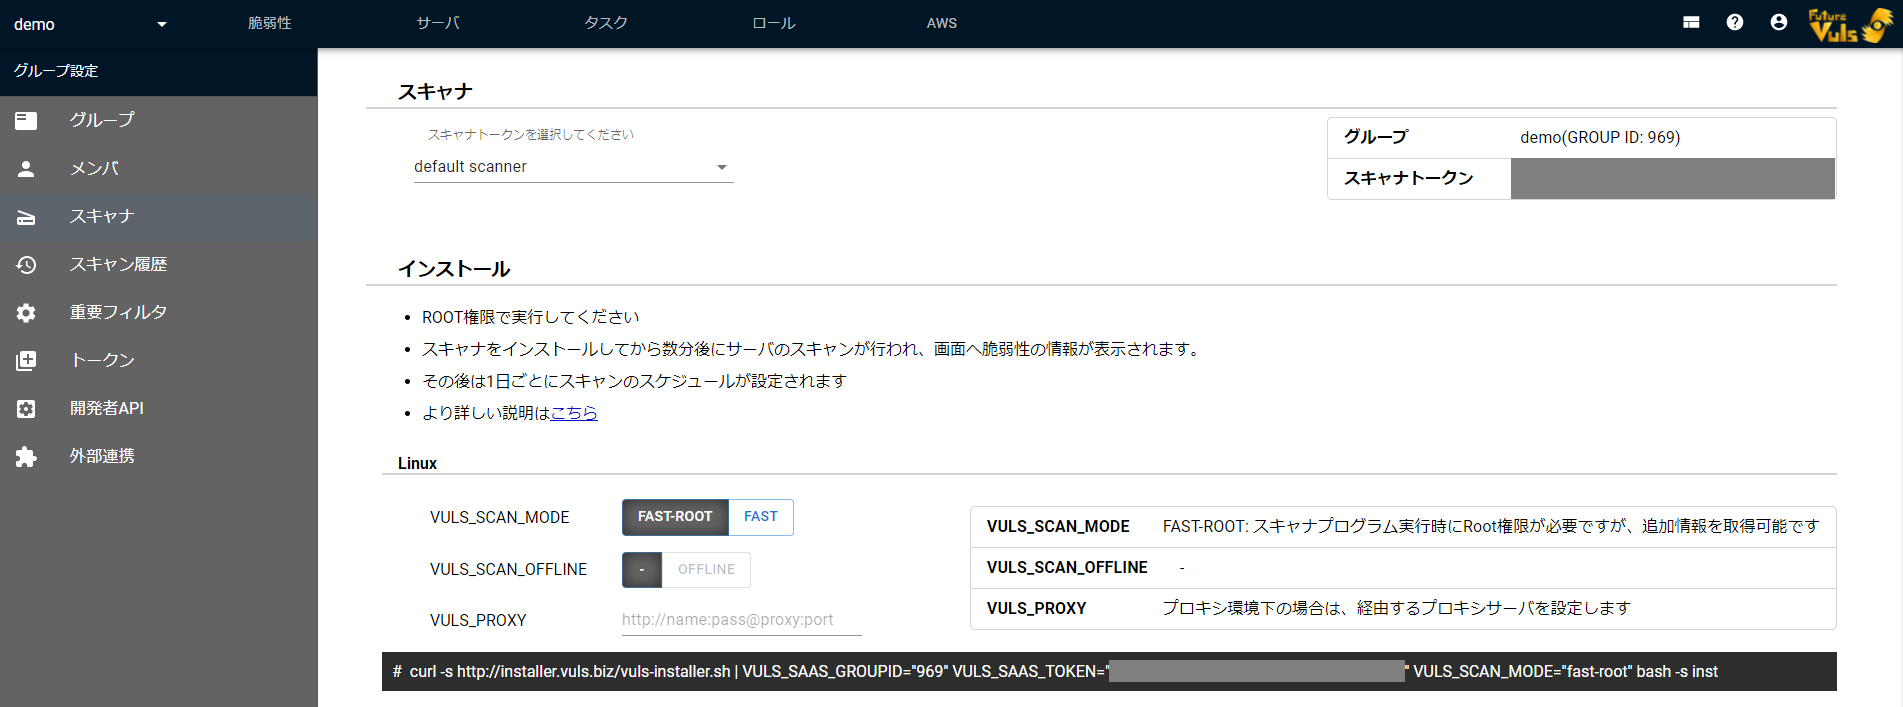
Checking the Installation Command#
- From the account icon in the upper right, click
Group Settings, then select theScannertab on the left.
- Configure options as needed.
You can select "Scanner Behavior Settings" and specify a proxy server. If not specifically required, you can use the default values.
| Item | Description |
|---|---|
| VULS_SCAN_MODE | Select whether to grant root privileges during scan execution. ・FAST-ROOT: Grants root privileges during scan execution. This allows the scanner to acquire information such as whether a package restart is required and the running status of processes. ・FAST: Does not grant root privileges during scan execution. Some information cannot be acquired. |
| VULS_SCAN_OFFLINE | Select online or offline scan. ・-(no value): Executes a scan in an online environment, which is the normal scan mode. ・OFFLINE: Specifies offline mode. Not supported on all OSes. |
| AUTO_REFRESH_BINARY | Configure automatic scanner updates. ・TRUE: Updates the scanner binary to the latest version before each scan. ・FALSE: Does not automatically update the scanner binary. |
| VULS_PROXY | If in a proxy environment, specify the URL of the proxy server to use. |
Copy the installation script and run it on the target server.
root@scan:~# curl -s https://installer.vuls.biz/vuls-installer.sh | VULS_SAAS_GROUPID='nnn' VULS_SAAS_TOKEN='xxx-xxxx-xxxx' VULS_SCAN_MODE='fast-root' AUTO_REFRESH_BINARY=true  bash -s inst
2025/03/01 00:00:00 [START      ]:      Install scanner.
2025/03/01 00:00:00 [SUCCESS    ]:      Check root user.
2025/03/01 00:00:00 [SUCCESS    ]:      Check distribution. [OS: ubuntu]
2025/03/01 00:00:00 [SUCCESS    ]:      Check Architecture [arch: x86_64]
2025/03/01 00:00:02 [SUCCESS    ]:      Install package. [debian-goodies]
2025/03/01 00:00:02 [SUCCESS    ]:      Create user and group. [user: vuls-saas / group: vuls-saas]
2025/03/01 00:00:02 [SUCCESS    ]:      Create directory. [/opt/vuls-saas]
2025/03/01 00:00:02 [SUCCESS    ]:      Create directory. [/var/log/vuls]
2025/03/01 00:00:04 [SUCCESS    ]:      Download binary. [/opt/vuls-saas/vuls   type: linux_x86_64]
2025/03/01 00:00:04 [SUCCESS    ]:      Download script. [/opt/vuls-saas/vuls-saas.sh]
2025/03/01 00:00:04 [SUCCESS    ]:      Create config. [/opt/vuls-saas/config.toml]
2025/03/01 00:00:04 [SUCCESS    ]:      Create sudoers. [/etc/sudoers.d/vuls-saas]
2025/03/01 00:00:04 [SUCCESS    ]:      Create cron. [/etc/cron.d/vuls-saas-scan]
2025/03/01 00:00:04 [END        ]:      Install scanner finish.
root@scan:~#
An automatic scan will now run daily, 5 minutes after installation completes.
Scanner Installation Execution Permissions
If the following message is displayed, switch to a user with root privileges and execute the command again.
2025/03/01 00:00:00 [START      ]:      chkRootUser
2025/03/01 00:00:00 [ERROR      ]:      Please run as root user.
First Manual Scan#
The first automatic scan will run 5 minutes after the installation is complete. If you want to scan immediately, you can also run it manually by following the steps below.
Execute /opt/vuls-saas/vuls-saas.sh with vuls-saas user privileges as follows.
- When running as the
vuls-saasuser withsudo
root@scan01:~# sudo -H -u vuls-saas /opt/vuls-saas/vuls-saas.sh >/dev/null 2>&1
root@scan01:~#
- When switching to the
vuls-saasuser to run
root@scan01:~# su - vuls-saas
vuls-saas@scan01:~$ /opt/vuls-saas/vuls-saas.sh
vuls-saas@scan01:~$
After the scan is finished, the results will appear on the FutureVuls web console shortly. If the results do not appear after several minutes, check the logs.
The execution results are recorded in the following files. Check the logs for errors to identify the cause.
- /opt/vuls-saas/scan.log
- Describes the success or failure of the scan.
- If the scan fails, the report information will not be uploaded to FutureVuls.
- /opt/vuls-saas/report.log
- Contains the scan result report and any errors related to uploading to FutureVuls.
- If the upload fails, it may be due to issues such as proxy settings.
Checking the Scan Time#
The scan time is set based on the scanner's installation time. You can change it to a time of your choice by editing the following file.
- The execution schedule is defined in
/etc/cron.d/vuls-saas-scan.- By default, it is set to 5 minutes after the scanner installation time.
- It uses cron format, so modify it as needed.
root@scan01:~# cat /etc/cron.d/vuls-saas-scan
5 0 * * * vuls-saas /opt/vuls-saas/vuls-saas.sh >/dev/null 2>&1
root@scan01:~#
Installing the Windows Scanner#
Install the scanner on a Windows server to detect vulnerabilities. Find the installation command on the FutureVuls console and run it on the Windows server to install the scanner.
- Ensure Windows Update is functional before proceeding
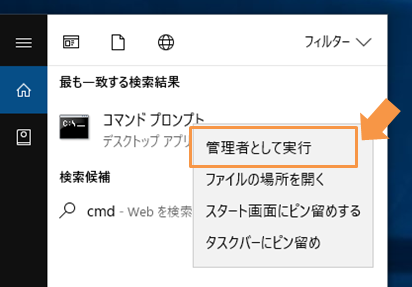
- The scanner must be installed from an administrator Command Prompt
When launching Command Prompt, right-click and select "Run as administrator" to start it with administrator privileges.
Settings Performed During Installation#
The following tasks are performed during the Windows scanner installation. The processes executed by the installer are publicly available in "this script".
Clicking the script link above will automatically download it. Do not execute the downloaded script directly.
| Process | Description |
|---|---|
| Placement of the scanner (binary) | C:\Program Files\vuls-saas\vuls.exe |
| Placement of the execution batch file | C:\Program Files\vuls-saas\vuls-saas.bat |
| Placement of the configuration file | C:\Program Files\vuls-saas\config.toml |
| Placement of the batch_config file | C:\Program Files\vuls-saas\batch_config.toml |
| Configuration of Task Scheduler | Configured in Task Scheduler (vuls-saas-scan) *Runs as SYSTEM user, once a day, 5 minutes after the installation time |
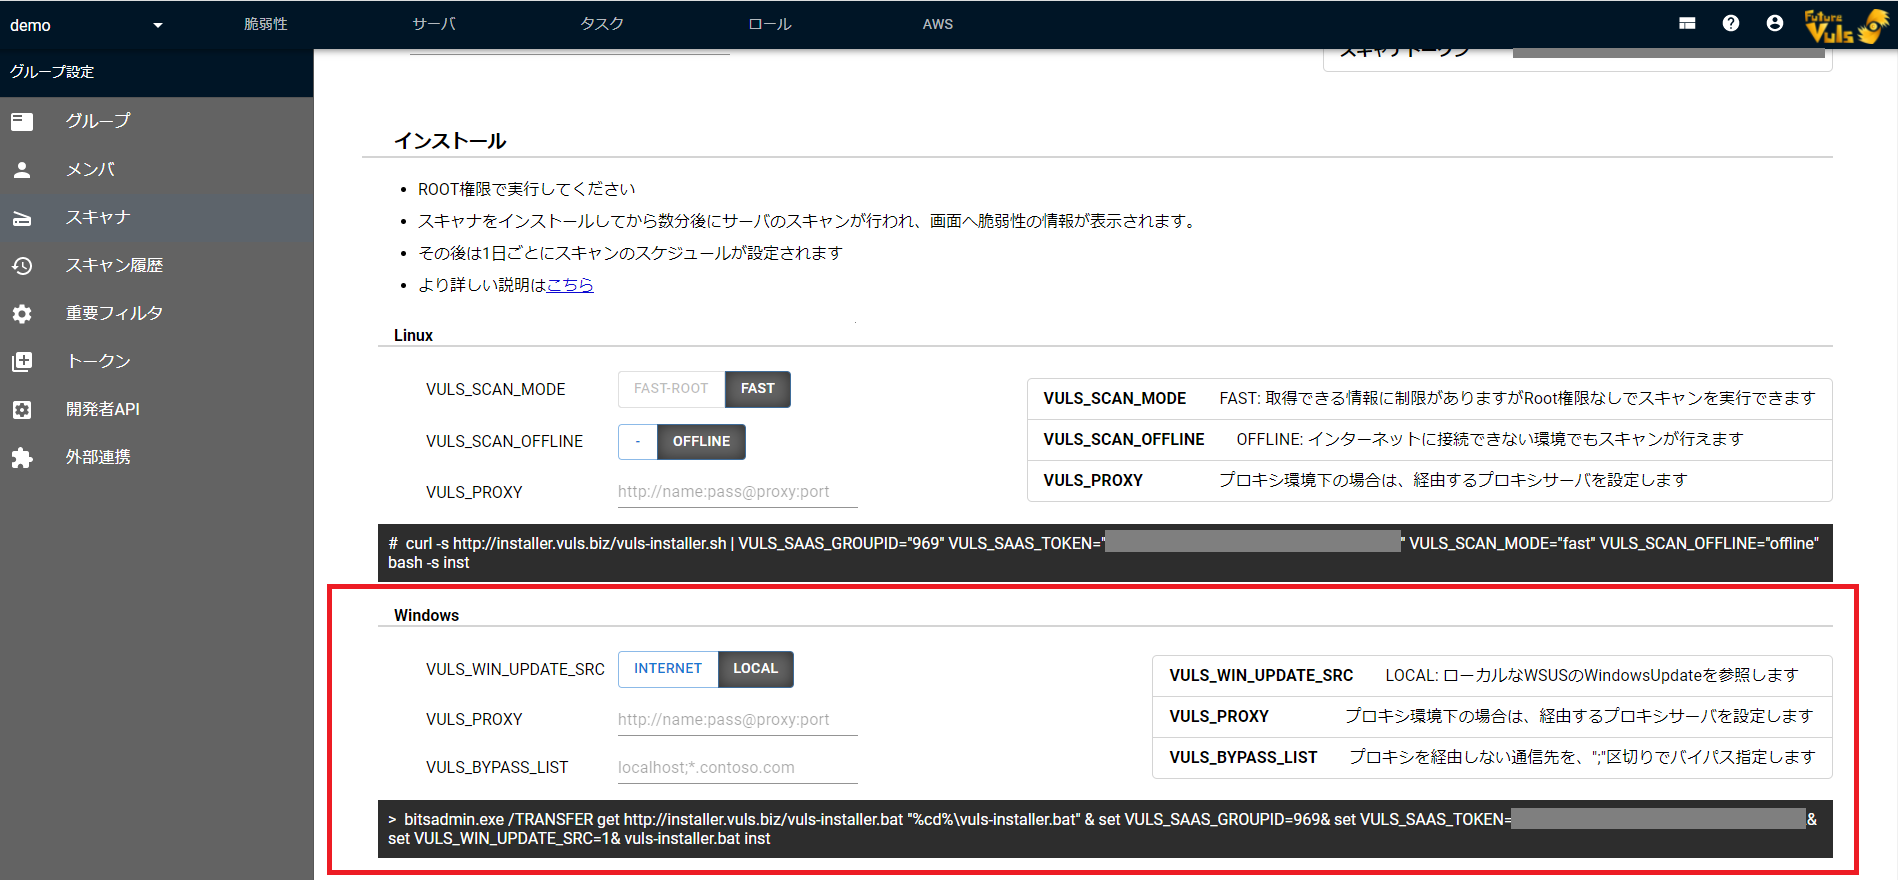
Checking the Installation Command#
From the account icon in the upper right, click Group Settings, then select the Scanner tab on the left.
Configure options as needed.
You can configure settings for "WSUS Environments" and specify a proxy server. If not specifically required, you can use the default values.
| Item | Description |
|---|---|
| VULS_WIN_UPDATE_SRC | Select the source for Windows Update. ・INTERNET: Use Windows Update on the internet. ・LOCAL: Use a local WSUS for Windows Update. |
| AUTO_REFRESH_BINARY | Configure automatic scanner updates. ・TRUE: Updates the scanner binary to the latest version before each scan. ・FALSE: Does not automatically update the scanner binary. |
| VULS_PROXY | If in a proxy environment, specify the URL of the proxy server to use. |
| VULS_BYPASS_LIST | Specify destinations that should bypass the proxy. Multiple destinations can be specified, separated by semicolons ";". |
- Copy the installation script and run it on the target server.
- An automatic scan will now run daily, 5 minutes after installation completes.
First Manual Scan#
The first automatic scan will run 5 minutes after installation is complete, but you can also run it manually if you want to scan immediately.
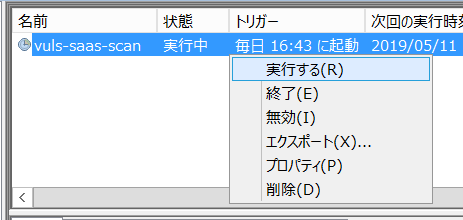
Running from Task Scheduler#
- Start the
vuls-saastask from the Task Scheduler.- Open the Task Scheduler.
- Right-click on
vuls-saaslocated at the top level of the task list and selectRun.
-
After the scan is finished, the results will appear on the web console shortly.
- If the results do not appear, check the logs.
The execution results are recorded in the following file. Check the log for errors to identify the cause.
C:\Program Files\vuls-saas\vuls-saas.log- Records the success or failure of the scan and the upload.
- If the scan fails, the report information will not be uploaded to FutureVuls.
Manual Scan from Command Prompt#
A manual scan can be performed by running the following command with administrator privileges.
C:\Program files\vuls-saas\vuls-saas.bat
Checking the Scan Time#
The scan time is set based on the scanner's installation time. The scan time can be changed to any desired time.
- Change the execution time of the
vuls-saastask in the Task Scheduler.
Installing the Trivy Scanner#
Container Image Scan#
Install Trivy in your local environment to scan container images and upload the results to FutureVuls. This method offers two installation modes: a standard version and a lightweight version. The differences are as follows.
| Item | Description | Standard Version | Lightweight Version |
|---|---|---|---|
| Root privileges | Whether root privileges are required for installation | Required | Not required |
| Supported Environments | Local environments where setup is possible | Reference | General Linux |
| Scheduled Scan | Whether to automatically scan the image periodically | Supported | Not supported |
The lightweight version does not require root privileges, but you must manually scan container images periodically. To keep vulnerability information up-to-date by constantly synchronizing container image configuration changes with FutureVuls, please use the standard version scan whenever possible.
Scanning a New Container Image#
To scan a new container image and register it in FutureVuls, follow these steps.
-
Open the dialog from the
Add Serverbutton on the Server tab and selectContainer Image Scan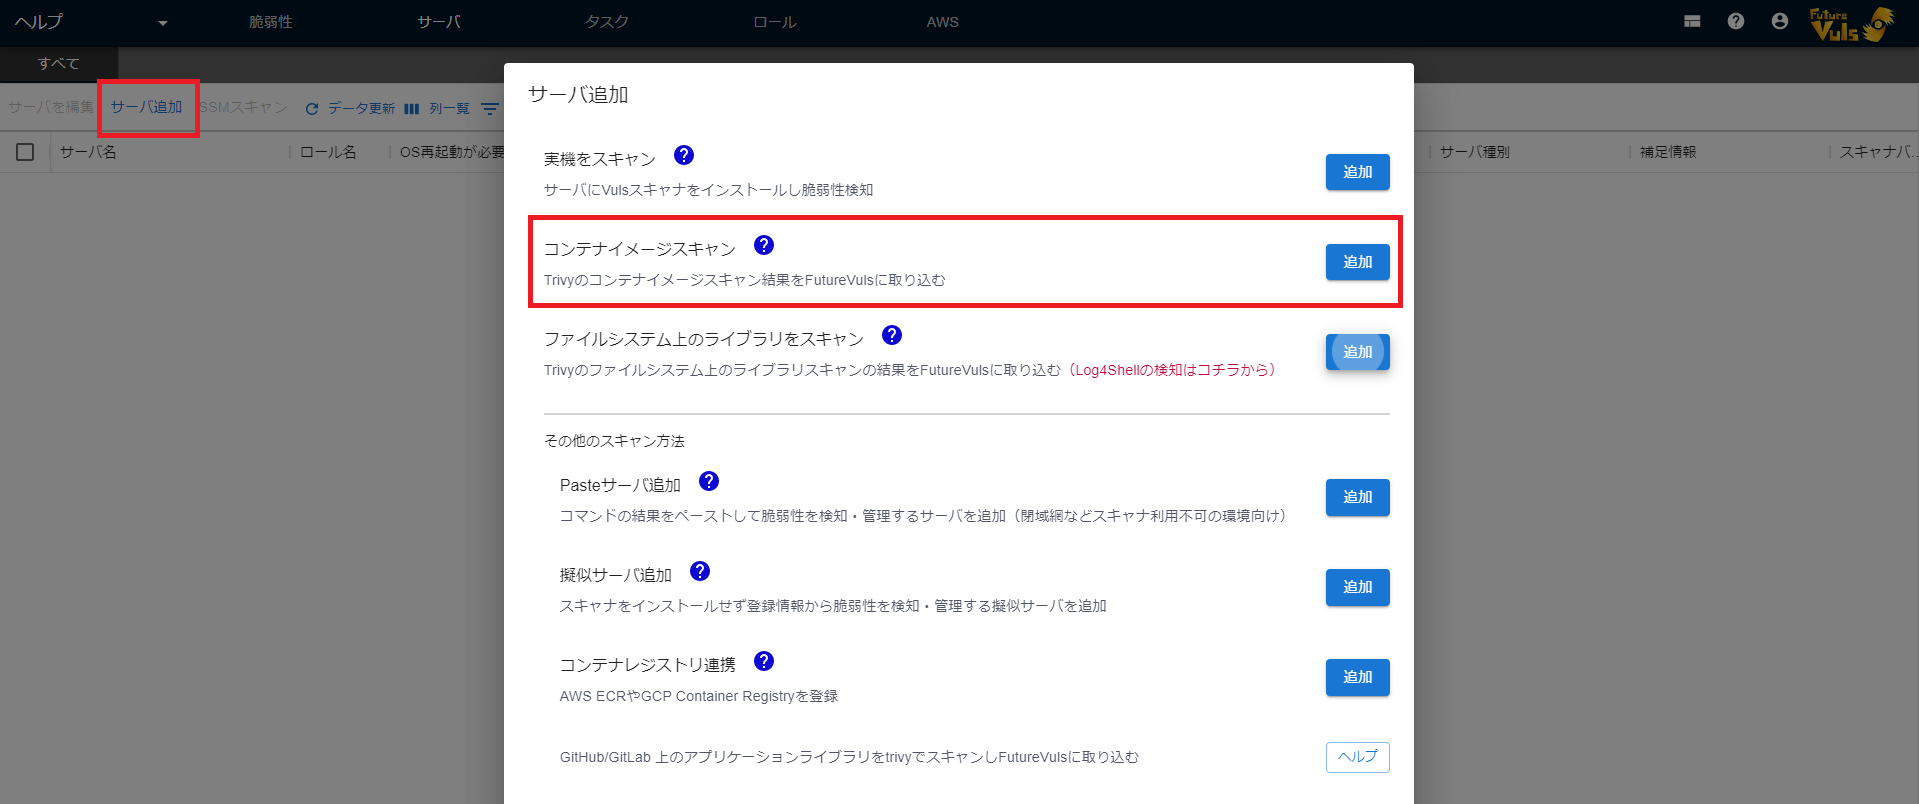
-
Select a scanner token and enter the name of the container image to scan.
Specify it in the format
<image_name>:<tag>. To always scan the latest version of an image, specify<image_name>:<latest>. -
If behind a proxy, enter the proxy server to use
- If using the lightweight version, check the switch bar
-
Copy the command displayed at the bottom of the screen, paste it into the local environment where the target image is managed, and execute it
For the standard version, run it with root privileges.
-
Confirm that the scanned image has been added to the Server tab of the target group in FutureVuls
For the standard version, it may take 5-10 minutes for the results to appear in FutureVuls. If you want to run a scan immediately after installation, execute the following command.
/opt/vuls-trivy-saas/vuls-trivy-saas.sh &> /opt/vuls-trivy-saas/vuls-trivy.log
This completes the registration. If you are using the standard version, the scanner will start automatically once a day to scan the target container image and upload the results to FutureVuls.
In the standard version, you can manually add scan options for target container images/libraries, etc., to config.toml.
For details, see "Scanner Behavior Settings".
Also, if the scan results do not appear, refer to this article.
Updating Information for a Registered Container Image#
To update vulnerability information based on the configuration of a container image already registered in FutureVuls, execute a manual scan from the FutureVuls console.
If there have been changes to a container image registered in FutureVuls, follow these steps to sync them with FutureVuls.
- For the standard version:
- No action is required as the scanner starts automatically once a day to scan the image.
- If you want to start the scanner immediately, run the following command as the
rootorvuls-trivy-saasuser./opt/vuls-trivy-saas/vuls-trivy-saas.sh &> /opt/vuls-trivy-saas/vuls-trivy.log
-
For the lightweight version:
- Click the target container image on the Server tab to open the server details page.
-
Click the
Update Configuration Informationbutton to open the dialog.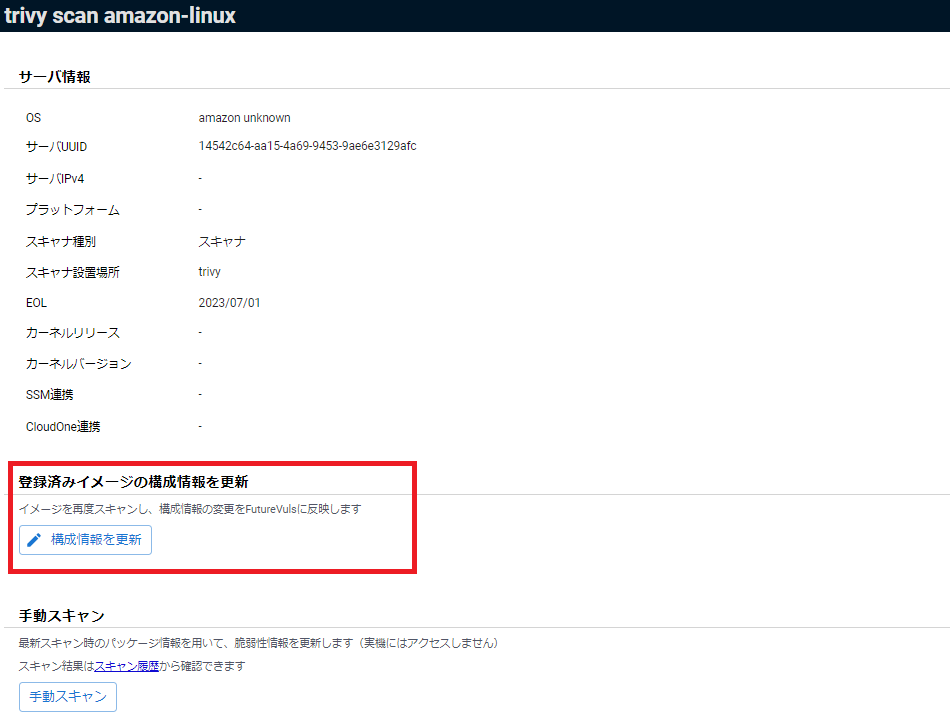
-
Select a scanner token and enter the name of the container image to scan.
- If behind a proxy, enter the proxy server to use.
- Copy the command displayed at the bottom of the screen, paste it into the local environment where the target image is managed, and execute it.
Application Library Scan#
Install Trivy in your local environment to scan application libraries and upload the results to FutureVuls. This method offers two installation modes: a standard version and a lightweight version. The differences are as follows.
| Item | Description | Standard Version | Lightweight Version |
|---|---|---|---|
| Root privileges | Whether root privileges are required for installation | Required | Not required |
| Supported Environments | Environments where setup is possible | Reference | General Linux |
| Scheduled Scan | Whether to automatically scan the application libraries periodically | Supported | Not supported |
The lightweight version does not require root privileges, but you must manually scan application libraries periodically. You also need to run it as a user with read permissions for all directories and files under the specified directory path. To keep vulnerability information up-to-date by constantly synchronizing dependent library configuration changes with FutureVuls, please use the standard version scan whenever possible.
Scanning New Dependent Libraries#
To scan new application libraries and register them in FutureVuls, follow these steps.
-
Open the dialog from the
Add Serverbutton on the Server tab and selectScan Libraries on File System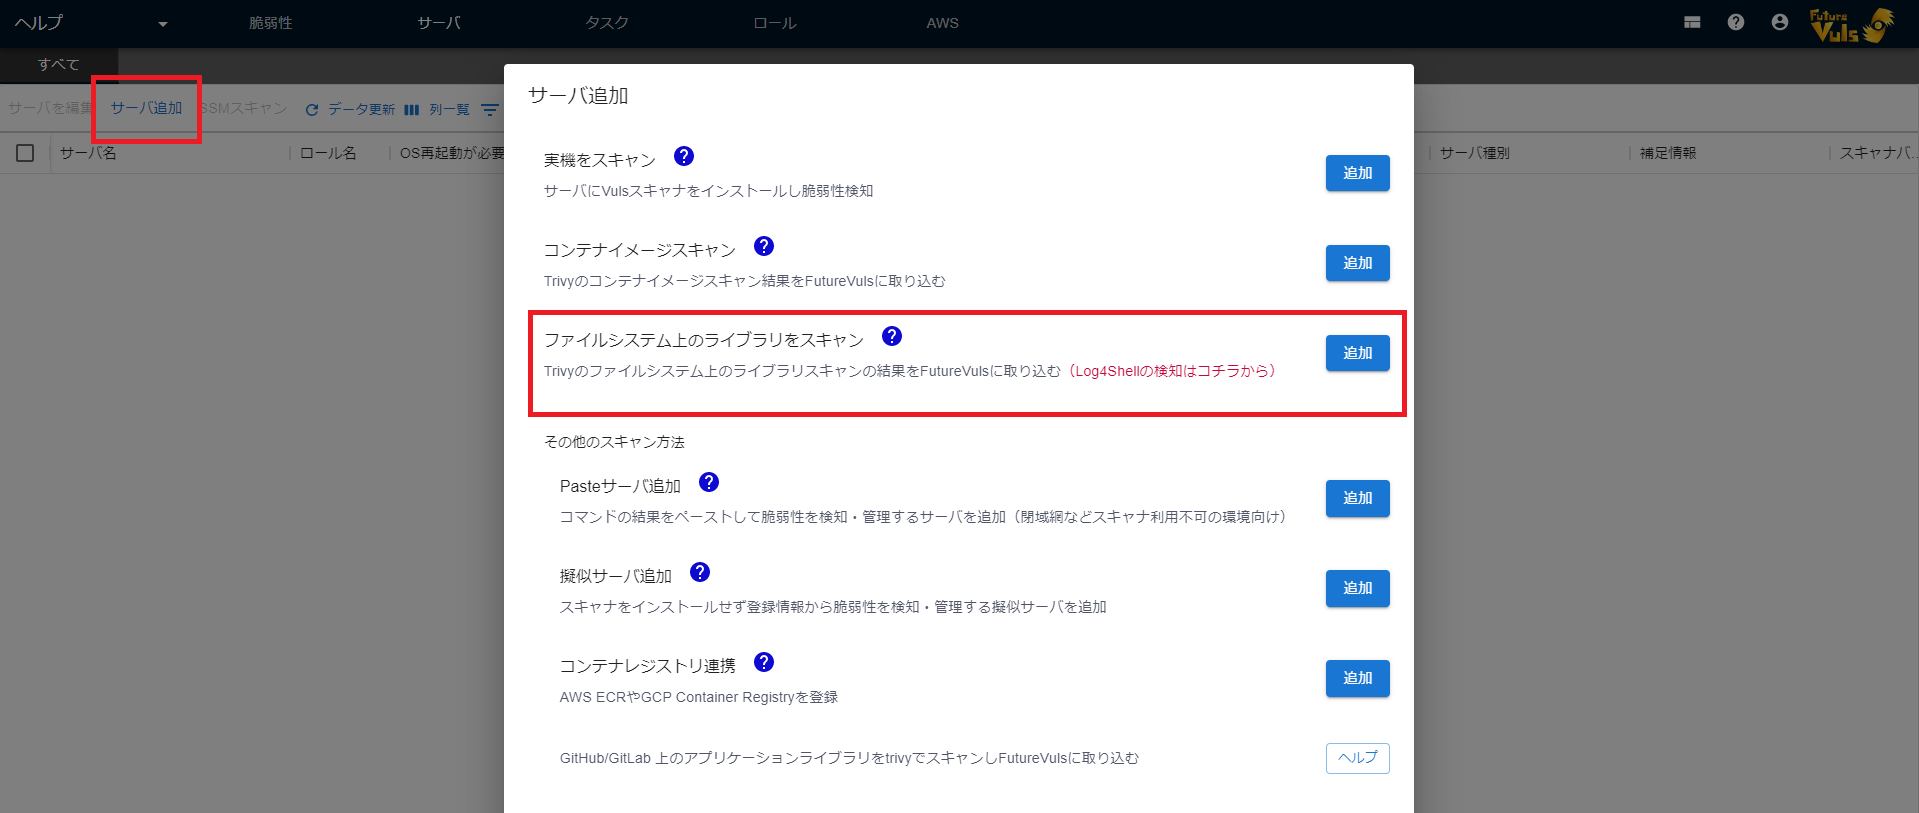
-
Select a scanner token and enter the absolute path of the directory to be scanned
If no path is specified, the root directory will be automatically selected, and all application libraries on the filesystem will be scanned.
-
If behind a proxy, enter the proxy server to use
- If using the lightweight version, check the switch bar
-
Copy the command displayed at the bottom of the screen, paste it into the local environment where the target application library is managed, and execute it
-
Confirm that the scanned directory has been added to the Server tab of the target group in FutureVuls
For the standard version, it may take 5-10 minutes for the results to appear in FutureVuls. If you want to run a scan immediately after installation, execute the following command.
/opt/vuls-trivy-saas/vuls-trivy-saas.sh &> /opt/vuls-trivy-saas/vuls-trivy.log
This completes the registration. If you are using the standard version, the scanner will start automatically once a day to scan the target directory and upload the results to FutureVuls.
In the standard version, you can manually add scan options for target container images/libraries, etc., to config.toml.
For details, see "Scanner Behavior Settings".
Also, if the scan results do not appear, refer to this article.
Updating Configuration Information for Registered Libraries#
Update vulnerability information based on registered configuration information
To update vulnerability information based on the configuration of application libraries already registered in FutureVuls, execute a manual scan from the FutureVuls console.
Sync application library configuration changes with FutureVuls
If there have been changes to the registered dependent libraries, follow these steps to sync them with FutureVuls.
- For the standard version:
- No action is required as the scanner starts automatically once a day to scan the image.
- If you want to start the scanner immediately, run the following command as the
rootorvuls-trivy-saasuser./opt/vuls-trivy-saas/vuls-trivy-saas.sh &> /opt/vuls-trivy-saas/vuls-trivy.log
-
For the lightweight version:
- Click the target server on the Server tab to open the server details page.
-
Click the
Update Configuration Informationbutton to open the dialog.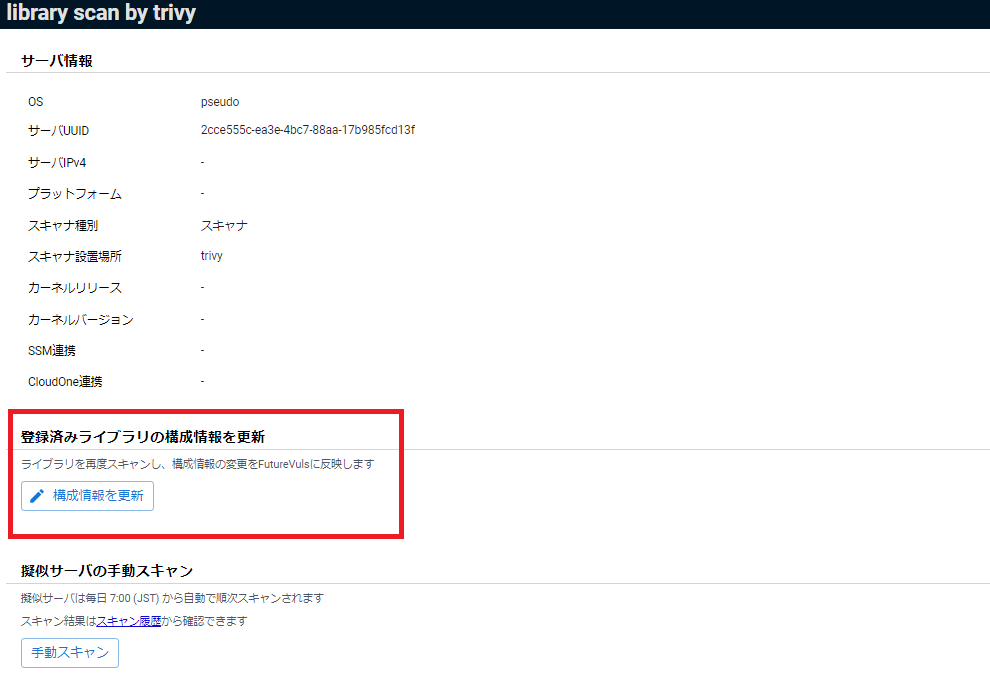
-
Select a scanner token and enter the absolute path of the directory to be scanned.
- If behind a proxy, enter the proxy server to use.
- Copy the command displayed at the bottom of the screen, paste it into the local environment where the target application library is managed, and execute it.