CPE/PURL Assignment#
This page explains how to properly assign and manage the identifiers (CPE/PURL) that FutureVuls requires to detect vulnerabilities and EOL information.
In many cases, FutureVuls automatically detects vulnerabilities based on software version information during a scan. However, for CPE scans and supply chain risk scans, you must explicitly assign an identifier (CPE/PURL) to the software.
CPEs and PURLs are automatically assigned if they are included when a server is registered. If not, you can assign them manually, or for Windows applications, you can enable the auto-assignment setting to have them assigned during a scan.
To help you choose the appropriate method for your situation, this page will explain the following in order:
- Distinguishing Between CPE and PURL - First, check which identifier you should assign.
- Manual CPE/PURL Assignment - This is the method for manually assigning an identifier to individual software.
- Automatic CPE Assignment - This is the method for enabling and managing the feature that automatically assigns CPEs to Windows applications.
Distinguishing Between CPE and PURL#
| Item | CPE (Common Platform Enumeration) | PURL (Package URL) |
|---|---|---|
| Primary Purpose | Vulnerability detection and some EOL detection | EOL detection, license detection, and vulnerability detection |
| Primary Targets | Middleware, commercial products, etc. | Mainly OSS libraries, frameworks, etc. |
| Identifier Example | cpe:/a:apache:http_server:2.4.54 |
pkg:maven/org.apache.logging.log4j/log4j-core@2.17.1 |
| Auto-Assignment | When CPE auto-assignment is enabled in Group Settings, CPEs are automatically assigned to Windows software during a scan (enabled by default for newly created groups; disabled by default for groups that already existed at the February 24, 2026 release). For details, see Automatic CPE Assignment. | ・Libraries detected by Application Scan / SBOM Import ・Dependent libraries in AWS environments detected by Amazon Inspector (*Requires configuration of Importing Amazon Inspector SBOMs) ・Software registered via GitHub Security Alerts Integration |
| Cases Requiring Manual Assignment |
・Middleware built from source ・Software installed via an installer (*Some Windows applications can be handled by CPE Auto-Assignment) ・Network devices, IoT devices |
・Libraries not automatically detected by scans |
| Detectable Information |
Vulnerabilities: Linked to vulnerability databases like NVD EOL: Products listed on vuls-saas/endoflife.date |
EOL: Detected by vuls-saas/endoflife.date and FutureVuls' proprietary logic (effective EOL) Vulnerabilities: Vulnerability information linked to PURLs, such as GHSA |
Recommended Usage#
- If your main goal is vulnerability detection, please assign a CPE (Manual Assignment or Auto-Assignment).
- While PURLs are automatically assigned to most OSS libraries, manually registering them in the rare case they are not assigned will enable supply chain risk detection.
- As a rule, do not assign a CPE/PURL to OS packages of Linux or container images (for details, see Assigning CPE/PURL to OS Packages).
Software with a CPE assigned is matched against vulnerability databases such as NVD (CPE-based detection), regardless of its software type. However, if one or more vulnerabilities are detected for the same software by a more accurate detection method (OS advisories, library vulnerability databases, etc.), the CPE-based detection results for that software are not used. If no vulnerabilities are detected by a more accurate detection method, the CPE-based detection results are used as they are.
The following table shows what CPE/PURL are used for, by software.
| Software | Normal Vulnerability Detection | Use of CPE | Use of PURL | Assignment Guideline |
|---|---|---|---|---|
| OS packages of Linux or container images (rpm, deb, apk, etc.) |
OS advisories (OVAL, Security Tracker, Red Hat VEX, etc.) | Matching against NVD, etc. Because this does not account for backporting, it causes false positives | Not used for individual EOL detection (except for private EOL information) | Do not assign (the exception is "CPE required (Trivy)") |
| Windows installed programs | CPE-based detection | Vulnerability detection and EOL detection | EOL detection, etc. | Assign a CPE (Automatic CPE Assignment is available) |
| Libraries | PURL-based detection (GHSA, etc.; based on the package information obtained by scans or SBOMs) | Results of matching against NVD, etc. are used only if no vulnerabilities are detected by PURL-based detection. EOL detection | Detection of vulnerabilities, EOL, OSS licenses, and malicious packages (usually assigned automatically) | A CPE is usually unnecessary. Assign a PURL manually if none is assigned |
| Middleware, commercial products, network devices, etc. | CPE-based detection | Vulnerability detection and EOL detection | EOL detection, etc. | Assign a CPE |
Assigning CPE/PURL to OS Packages#
As a rule, do not assign a CPE/PURL to OS packages of Linux distributions or container images (software managed by package managers such as rpm, deb, and apk). Note that Windows installed programs also have the software type os, but they are not covered by the explanation below (their vulnerabilities and EOL are detected based on CPEs).
Vulnerability Detection for OS Packages#
Vulnerabilities in OS packages are detected using OVAL and Security Trackers provided by Linux distributors, and OS-specific advisories (such as Red Hat VEX). These vulnerability databases contain accurate version information that accounts for backporting, so vulnerabilities are detected accurately without assigning a CPE/PURL.
If you assign a CPE to an OS package, that CPE is also matched against vulnerability databases such as NVD.
- For packages with one or more vulnerabilities detected by OS advisories, the CPE-based detection results are not used.
- For packages with no vulnerabilities detected by OS advisories (packages already updated to the latest version, packages not included in the OS vulnerability databases, etc.), the CPE-based detection results are used as they are.
Because NVD version ranges do not account for backporting, vulnerabilities that the package provider has already fixed through backporting are also detected as unfixed vulnerabilities. As a result, the more up to date a package is (and thus actually free of vulnerabilities), the more likely false positives are to occur. For details, see "Registering CPEs for OS Packages".
EOL Detection for OS Packages#
Because the support period of Linux OS packages follows the lifecycle of the OS itself, assigning a CPE/PURL to them is not used for individual EOL detection (except when registered as private EOL information; for details, see "Handling of OS Packages").
Exception: OS Packages Shown as "CPE required (Trivy)"#
For OS packages whose Vulnerability Detection column in the software list shows "CPE required (Trivy)", the scanner (Trivy) identified them as third-party packages and skipped matching them against the OS vulnerability databases. Their vulnerabilities cannot be detected as they are, so assign a CPE as needed. Assigning a CPE makes them subject to CPE-based detection. Even in this case, NVD version ranges do not account for backporting, so vulnerabilities that the package provider has fixed through backporting may be reported as false positives. Check the fix status of detected vulnerabilities against the provider's advisories.
"CPE required (Trivy)" is shown only for servers scanned with trivy-to-vuls v0.41.0 or later. With an earlier version, OS packages for which Trivy skipped matching are also shown as "Detectable", so update the scanner to v0.41.0 or later.
Behavior When Both CPE and PURL Are Assigned#
You can assign both a CPE and a PURL to a single piece of software. The order of assignment does not affect the behavior.
The vulnerability detection behavior when both are assigned depends on the software type.
| Detection Target | CPE only | PURL only | Both CPE + PURL |
|---|---|---|---|
| Vulnerabilities (NVD, etc.) | ✓ | ー | ✓ (*1) |
| Vulnerabilities (GHSA, etc.) | ー | ✓ | ✓ (*1) |
| EOL | ✓ (Products on endoflife.date) | ✓ (endoflife.date + FutureVuls proprietary logic) | ✓ (Both detection methods are enabled) |
| OSS Licenses | ー | ✓ | ✓ |
| Malicious Packages | ー | ✓ | ✓ |
Vulnerability Detection for Software Type 'library' (*1)
For software of type library, vulnerability detection works as follows:
If one or more vulnerabilities are detected by PURL-based detection (GHSA, etc.), the CPE-based (NVD, etc.) detection results for that library are not used. This is because GHSA vulnerability information is more accurate for libraries, and it prevents false positives caused by poorly maintained version range information in NVD.
If no vulnerabilities are detected by PURL-based detection, the CPE-based detection results are used as they are. In this case, the results may include false positives caused by poorly maintained version range information in NVD.
Vulnerability Detection for Software Types Other Than 'library'
For software types other than library:
- Detection based on NVD, etc. (CPE-based) will be enabled
- Detection based on GHSA, etc. (PURL-based) will not be performed
For software other than libraries, such as middleware and commercial products, CPE-based NVD detection is the primary means of vulnerability detection.
However, for OS packages of Linux or container images, if one or more vulnerabilities are detected by OS advisories, the CPE-based detection results are not used (for details, see Assigning CPE/PURL to OS Packages).
EOL Detection Priority
EOL detection methods have a priority, applied in the order of detected by endoflife.date > detected by FutureVuls proprietary logic (effective EOL).
- Example: If endoflife.date detects "2025-06-30 EOL" and FutureVuls proprietary logic detects "2025-05-30 EOL", even though the FutureVuls logic date is earlier, the endoflife.date of 2025-06-30 will take precedence.
If both a CPE and a PURL are assigned and different EOLs are detected via endoflife.date for both, the earlier EOL date will take precedence.
- Example: If an EOL of "2025-06-30" is detected via CPE from endoflife.date, and an EOL of "2025-12-31" is detected via PURL from endoflife.date, the earlier date of 2025-06-30 will be used.
When to Assign Both
- When you want to add EOL, license, and malicious package detection to software (other than library) that already uses CPE for vulnerability detection: Assign a PURL in addition. NVD vulnerability detection will remain active.
- When you also assign a CPE to a library managed by PURL: EOL detection (via endoflife.date) will also be enabled on the CPE side. On the other hand, while vulnerabilities are detected by PURL-based detection, the NVD detection results are not used (see *1). Assigning a CPE for the purpose of NVD-based vulnerability detection is unnecessary in this case.
Manual CPE/PURL Assignment#
Assigning CPE/PURL to Software#
From the Software tab, click on the target software. You can assign a CPE or PURL from "Assign CPE/PURL" on the details screen.
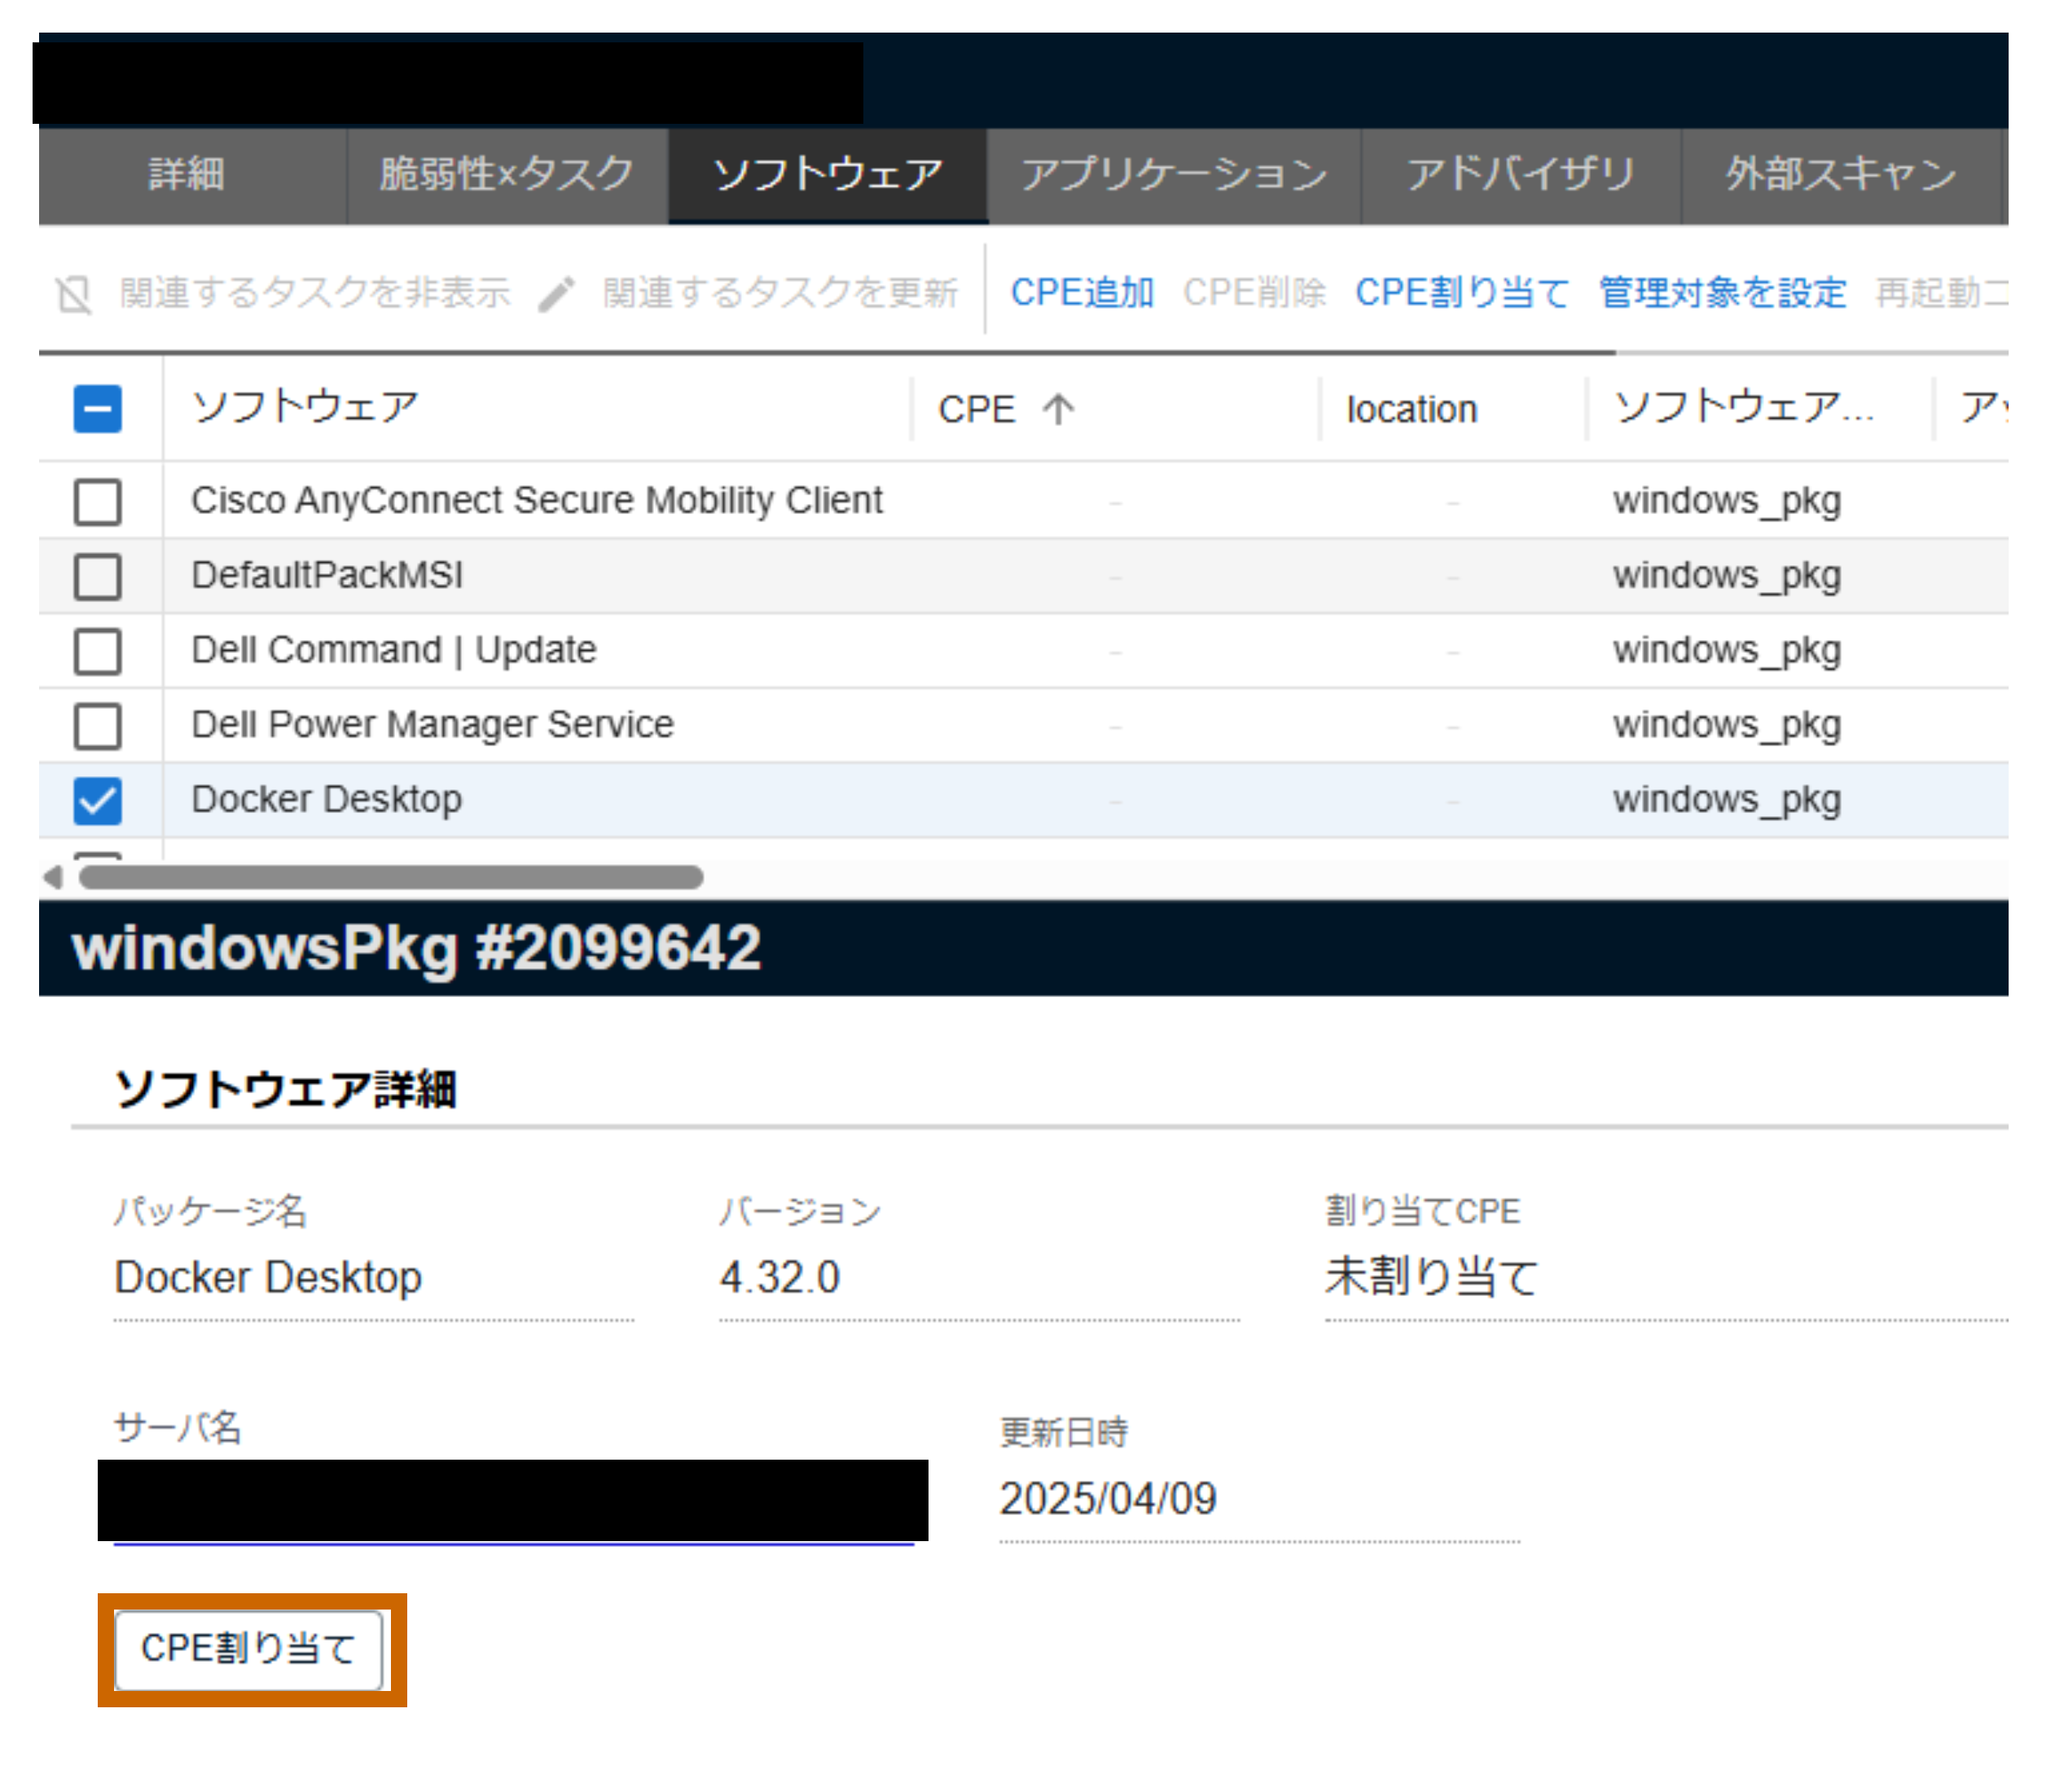
You can choose from the following two methods to register a CPE.
-
CPE Auto Assignment
Automatically assigns a CPE to the software based on a verified dictionary.
-
Assign with Vendor/Product
Specify the vendor and product names, and the version will be automatically completed. You can choose from the following methods for specification.
Method Description Recommended CPE Select a CPE with high relevance to the software name Search CPE Search for CPE candidates and select the version, edition, etc. Enter Directly Enter the CPE directly
For Japan-specific software, you can also use JVN as the vulnerability database (Details).
About the Recommendation Feature's Learning Function
The CPE information you assign to software is used to train and improve the accuracy of recommendations. Rest assured that measures are in place to prevent user identification. Terms of Service
To register a PURL, enter the PURL string (e.g., pkg:maven/org.apache.logging.log4j/log4j-core@2.17.1) into the text box. There are no recommendation or search functions like there are for CPEs.
For the PURL format, please refer to the PURL spec.
Bulk Assignment to Software#
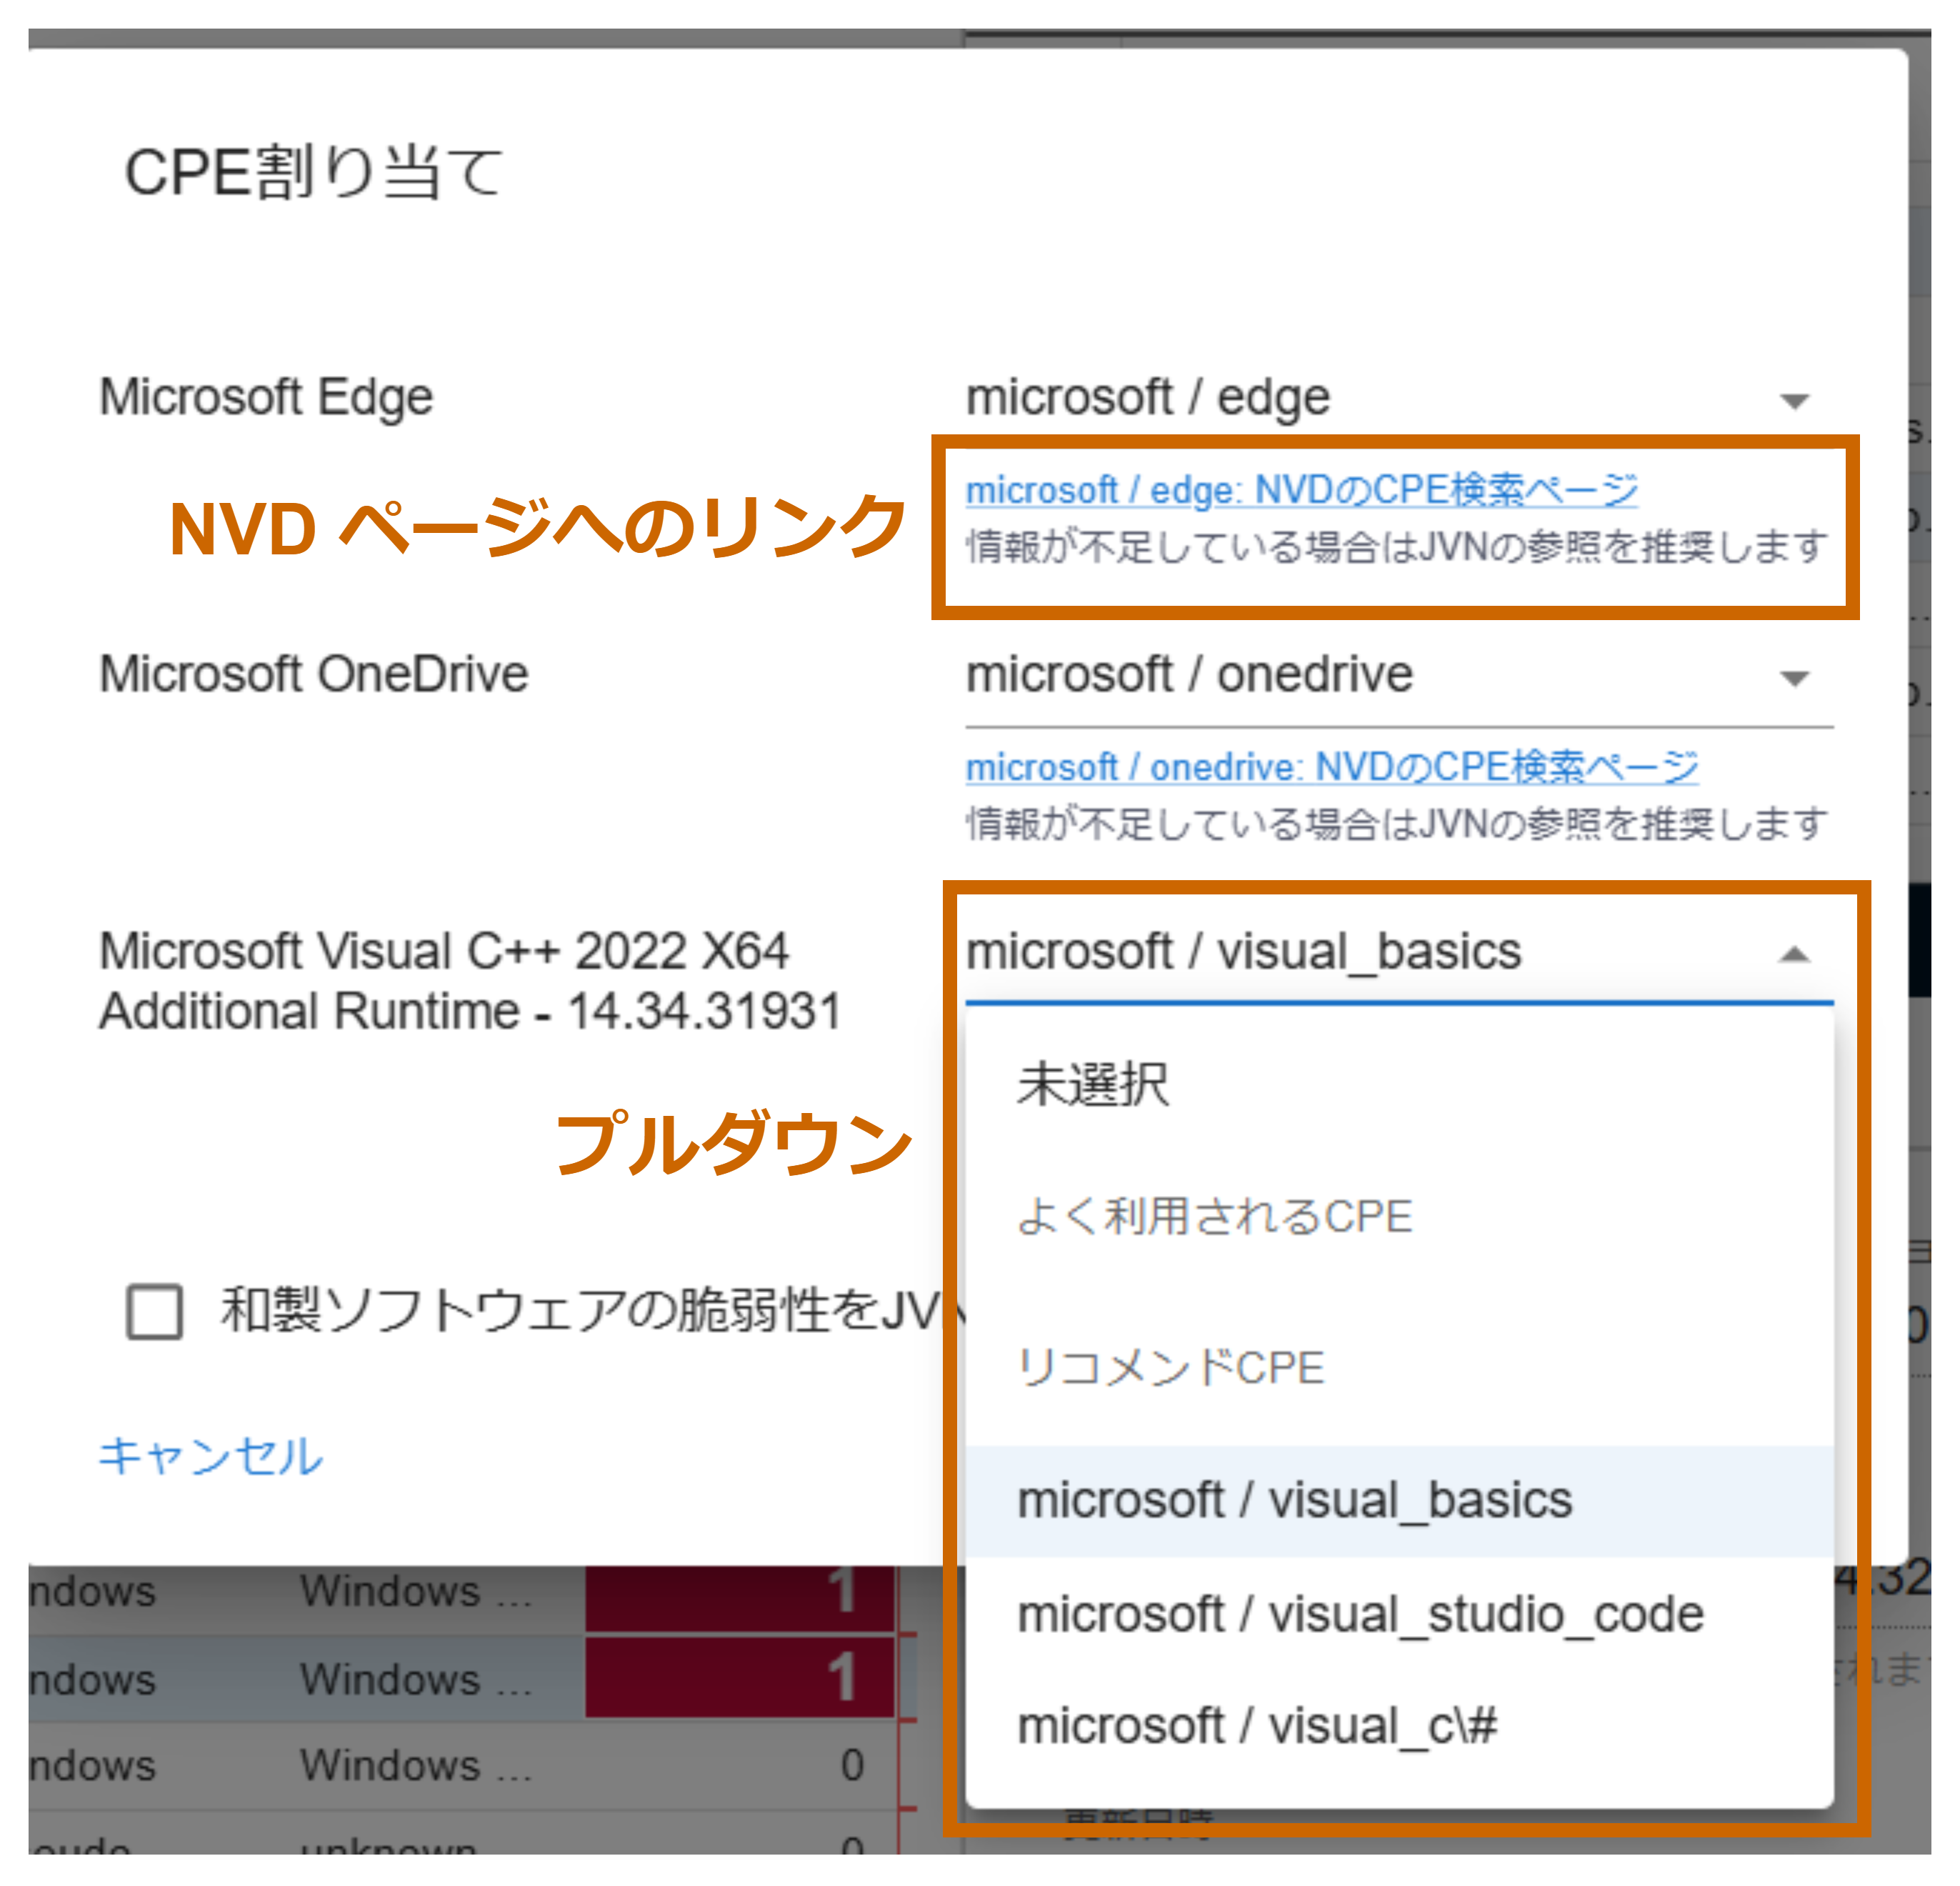
On the Software tab, you can select multiple pieces of software to which you want to assign a CPE and assign them in bulk from the "Assign CPE" button.
For bulk assignment, you can only select vendor and product names from the recommended candidates. Select the vendor and product to assign from the dropdown menu.
Additionally, a link to the NVD search page is displayed under each vendor/product. By clicking the link, you can check if the corresponding CPE exists in NVD. Use this to help decide whether to collect JVN vulnerability information.
Deleting Assigned CPE/PURL#
If you want to delete an assigned CPE/PURL, click on the target software in the Software tab and press the delete icon. When an assignment is deleted, all vulnerability information and task information that was detected using that identifier will be deleted. However, if that vulnerability or task is also linked to other software on the same server, it will not be deleted.
Automatic CPE Assignment#
In Windows environments, it is crucial not only to manage the OS's own updates but also to address vulnerabilities in installed third-party products (like Google Chrome, Adobe Acrobat Reader, etc.). However, manually looking up and assigning CPEs for each of these applications is time-consuming and labor-intensive.
The "CPE Auto Assignment" feature uses FutureVuls' proprietary verified CPE dictionary to match with Windows software detected during a scan and automatically assigns a CPE. This allows you to detect vulnerabilities in Windows third-party products without the tedious manual registration process.
The following sections describe each step in the usage flow and explain how to disable the feature.
Accuracy of Automatically Assigned CPEs
Automatic CPE assignment currently matches only the software name and version obtained from the scan against the verified CPE dictionary. Other elements, such as the edition, are not specified. As a result, a CPE that differs from the actual software may be assigned. We plan to improve assignment accuracy by also matching the vendor name and edition in the future.
If you want to re-specify the CPE accurately, including elements such as the edition, first disable automatic assignment as described in Disabling Automatic CPE Assignment for Specific Software, and then assign the CPE manually using "Assign with CPE" on the software details screen.
1. Enable Automatic CPE Assignment (Group Settings)#
To use this feature, enable "CPE Auto Assignment" in the Group Settings.
- The default setting for newly created groups is Enabled.
- The default setting for groups that already existed at the February 24, 2026 release (when this feature was added) is Disabled.
2. CPE Auto-Assignment via Scanning#
After enabling, CPEs will be automatically assigned during scans based on the verified CPE dictionary.
- This applies only to Windows software.
- Software to which a CPE has been manually assigned is not eligible for auto-assignment (manual assignments always take precedence).
flowchart LR
    A[Scan starts] --> B{CPE auto-assignment<br>enabled?}
    B -- No --> I[Proceed to vulnerability detection]
    B -- Yes --> F{"CPE already assigned?<br>(manually, via SBOM, etc.)"}
    F -- Yes --> I
    F -- No --> D{Match in verified<br>CPE dictionary?}
    D -- No --> I
    D -- Yes --> H[Assign verified CPE]
    H --> I
3. Checking CPE Assignment Status (Software List)#
On the Software List screen, you can check the CPE assignment status in the "CPE Assignment Type" column, which is categorized into the following five types.
| CPE Assignment Type | Description |
|---|---|
| Auto | CPE automatically assigned based on the verified CPE dictionary. |
| Manual (Verified) | Manually assigned CPE matches the recommended CPE from the verified CPE dictionary. |
| Manual (Mismatch) | Manually assigned CPE differs from the recommended CPE in the verified CPE dictionary. A warning icon is displayed on the software details screen, and the recommended CPE can be viewed in a tooltip. |
| Manual (Not Verified) | There is no corresponding entry in the verified CPE dictionary for the manually assigned CPE. |
| Not assigned | No CPE has been assigned. |
Filtering by CPE Assignment Type is also supported. For information on screen display and filter operations, please see Software List.
4. Disabling Automatic CPE Assignment for Specific Software#
If you want to exclude specific software from automatic CPE assignment, you can disable it individually. This is useful, for example, when an automatically assigned CPE's version is ANY, which creates a large number of tasks.
- You can disable it from the Software Details screen, or in bulk from "CPE Auto Assignment" in the Software List. In the Software List, you can target not only the selected software but also all software matching the current filter (Bulk Operations on All Filtered Rows).
- When disabled, the automatically assigned CPE is removed, and the software will be excluded from auto-assignment in subsequent scans.
- With the removal of the CPE, related vulnerability information and tasks are also deleted (this behavior is the same as Deleting Assigned CPE/PURL). However, if that vulnerability or task is also linked to other software on the same server, it will not be deleted.
- Even if you enable it per software (for both selected software and all filtered rows), software to which a CPE is already assigned is excluded from automatic assignment.
5. Disabling the Automatic CPE Assignment Feature (Group Settings)#
If you wish to disable Automatic CPE Assignment, you can turn it off from the Group Settings.
- When disabled, no new automatic assignments will occur in subsequent scans.
- Even when disabled, previously auto-assigned CPEs are kept by default.
- You can select the "Bulk delete CPEs that were automatically assigned" option to delete all auto-assigned CPEs at once.
- Performing a bulk deletion will also delete the vulnerability information and tasks associated with the deleted CPEs. However, if that vulnerability or task is also linked to other software on the same server, it will not be deleted.