Scanning Network Devices#
By using CPE scanning, you can detect and manage vulnerabilities in network devices on FutureVuls.
Network devices can be registered in two ways: manually through the user interface or through automatic detection by executing a command.
Adding Detection Data Sources#
In addition to NVD and JVN, FutureVuls incorporates primary information published by vendors as data sources for scanning network devices. This allows for faster and more accurate detection of network device vulnerabilities compared to relying solely on NVD.
Newly Added Data Sources (from July 14, 2025)
The primary information from the following vendors has been newly added as data sources:
- Palo Alto Networks Security Advisories
- Data Source: https://security.paloaltonetworks.com/
- Collects and integrates the latest vulnerability information for Palo Alto Networks products.
- Cisco Security Advisories
- Data Source: https://sec.cloudapps.cisco.com/security/center/publicationListing.x
- Collects and integrates comprehensive security information for Cisco products.
As of March 2026, primary information from the following companies has been added as data sources for detection.
- Cisco
- Fortinet
- Palo Alto Networks
Registering Network Devices with Commands#
You can use commands to perform a batch process for each network, from acquiring the CPE of the software used in network devices to registering the CPEs in FutureVuls. Linux, Windows, and macOS are supported. It is also recommended to run these commands periodically using cron, Task Scheduler, or a similar tool. For detailed usage of the commands, please also refer to the "README".
There are two commands to use:
-
future-vuls discover -
future-vuls add-cpe
By executing them in order, you can manage CPE information on a per-network basis.
Command Installation Procedure#
To execute the discover / add-cpe commands mentioned above, please complete the installation by following these steps:
- Download the
future-vulsandsnmp2cpebinaries for your OS from "releases". - Place the
future-vulsandsnmp2cpebinaries in the same directory, as shown below.
- /path/to/directory (any directory)
  - future-vuls (binary)
  - snmp2cpe (binary)
Download the archives whose file names contain windows_amd64 from "releases".
(e.g., future-vuls_x.x.x_windows_amd64.tar.gz / snmp2cpe_x.x.x_windows_amd64.tar.gz)
After downloading, you can extract them in Command Prompt or PowerShell as follows.
tar xzf future-vuls_x.x.x_windows_amd64.tar.gz
tar xzf snmp2cpe_x.x.x_windows_amd64.tar.gz
- C:\path\to\directory (any directory)
  - future-vuls.exe (binary)
  - snmp2cpe.exe (binary)
After installation is complete, execute the commands in the directory where you placed future-vuls and snmp2cpe.
Command Descriptions and Usage#
future-vuls discover#
This command discovers hosts within the network specified by a CIDR range, executes snmp2cpe on hosts that respond, and lists the hosts for which CPEs could be obtained in a TOML file.
On subsequent runs, it will only append newly discovered hosts.
When this happens, the old file is renamed with a timestamp.
For more information about snmp2cpe, please refer to its "README".
Specifying a CIDR range is mandatory to execute this command.
Among the listed hosts, change the fvuls_sync value to true for those whose CPE information you want to register with FutureVuls.
#Command help
./future-vuls discover -h
discover hosts with CIDR range. Run snmp2cpe on active host to get CPE. Default outputFile is ./discover_list.toml

Usage:
  future-vuls discover --cidr <CIDR_RANGE> --output <OUTPUT_FILE> [flags]

Examples:
future-vuls discover --cidr 192.168.0.0/24 --output discover_list.toml

Flags:
      --cidr string           cidr range
      --community string      snmp community name. default: public
  -h, --help                  help for discover
      --output string         output file
      --snmp-version string   snmp version v1,v2c and v3. default: v2c
#Usage example
./future-vuls discover --cidr 192.168.0.1/24
Discovering 192.168.0.1/24...
192.168.0.1: Execute snmp2cpe...
failed to execute snmp2cpe. err: failed to execute snmp2cpe. err: exit status 1
192.168.0.2: Execute snmp2cpe...
failed to execute snmp2cpe. err: failed to execute snmp2cpe. err: exit status 1
192.168.0.4: Execute snmp2cpe...
failed to execute snmp2cpe. err: failed to execute snmp2cpe. err: exit status 1
192.168.0.6: Execute snmp2cpe...
New network device found 192.168.0.6
wrote to discover_list.toml
Run the commands in Command Prompt or PowerShell.
# Command help
.\future-vuls.exe discover -h
# Usage example
.\future-vuls.exe discover --cidr 192.168.0.1/24
Discovering 192.168.0.1/24...
192.168.0.1: Execute snmp2cpe...
failed to execute snmp2cpe. err: failed to execute snmp2cpe. err: exit status 1
192.168.0.2: Execute snmp2cpe...
failed to execute snmp2cpe. err: failed to execute snmp2cpe. err: exit status 1
192.168.0.4: Execute snmp2cpe...
failed to execute snmp2cpe. err: failed to execute snmp2cpe. err: exit status 1
192.168.0.6: Execute snmp2cpe...
New network device found 192.168.0.6
wrote to discover_list.toml
#Example of a generated TOML file
["192.168.0.6"]
  ip = "192.168.0.10"
  server_name = "192.168.0.6"
  uuid = ""
  cpe_uri = ["cpe:2.3:h:fortinet:fortigate-50e:-:*:*:*:*:*:*:*","cpe:2.3:o:fortinet:fortios:5.4.6:*:*:*:*:*:*:*"]
  fvuls_sync = false
future-vuls add-cpe#
This command registers hosts with fvuls_sync set to true as pseudo-servers in FutureVuls and assigns each a UUID.
The registration name of the pseudo-server can be changed by modifying server_name.
If the registered server name differs from server_name, the server_name in the TOML file will be automatically updated to match the registered name when the command is executed.
After that, it registers the cpe_uri from the TOML file as a CPE for the pseudo-server in FutureVuls.
To execute this command, a FutureVuls REST API token with "Update" permission is required. For information on how to obtain a token, please refer to "FutureVuls API".
#Command help
./future-vuls add-cpe -h
Create a pseudo server in Fvuls and register CPE. Default outputFile is ./discover_list.toml

Usage:
  future-vuls add-cpe --token <VULS_TOKEN> --output <OUTPUT_FILE> [flags]

Examples:
future-vuls add-cpe --token <VULS_TOKEN>

Flags:
  -h, --help                help for add-cpe
      --http-proxy string   proxy url
      --output string       output file
  -t, --token string        future vuls token ENV: VULS_TOKEN
#Usage example
$ ./future-vuls add-cpe --token xxxx-xxxxxx-xxxx-xxxx-xxxx-xxxxxx
Creating 1 pseudo server...
192.168.0.6: Created FutureVuls pseudo server ce024b45-1c59-5b86-1a67-e78a40dfec01
wrote to discover_list.toml

Uploading 1 server's CPE...
192.168.0.6: Uploaded CPE cpe:2.3:h:fortinet:fortigate-50e:-:*:*:*:*:*:*:*
192.168.0.6: Uploaded CPE cpe:2.3:o:fortinet:fortios:5.4.6:*:*:*:*:*:*:*
Run the commands in Command Prompt or PowerShell.
# Command help
.\future-vuls.exe add-cpe -h
# Usage example
.\future-vuls.exe add-cpe --token xxxx-xxxxxx-xxxx-xxxx-xxxx-xxxxxx
Creating 1 pseudo server...
192.168.0.6: Created FutureVuls pseudo server ce024b45-1c59-5b86-1a67-e78a40dfec01
wrote to discover_list.toml

Uploading 1 server's CPE...
192.168.0.6: Uploaded CPE cpe:2.3:h:fortinet:fortigate-50e:-:*:*:*:*:*:*:*
192.168.0.6: Uploaded CPE cpe:2.3:o:fortinet:fortios:5.4.6:*:*:*:*:*:*:*
# Example of a generated TOML file
["192.168.0.6"]
  ip = "192.168.0.6"
  server_name = "192.168.0.6"
  uuid = "ce024b45-1c59-5b86-1a67-e78a40dfec01"
  cpe_uri = ["cpe:2.3:h:fortinet:fortigate-50e:-:*:*:*:*:*:*:*", "cpe:2.3:o:fortinet:fortios:5.4.6:*:*:*:*:*:*:*"]
  fvuls_sync = true
Important Notes#
Network Device Part Type#
When registering a CPE for a network device, please register the information corresponding to the part type o (OS), not h (hardware).
Vulnerabilities for devices registered with the part type h, as shown below, will not be detected.
Version 2.2: cpe:/h
Version 2.3: cpe:2.3:h
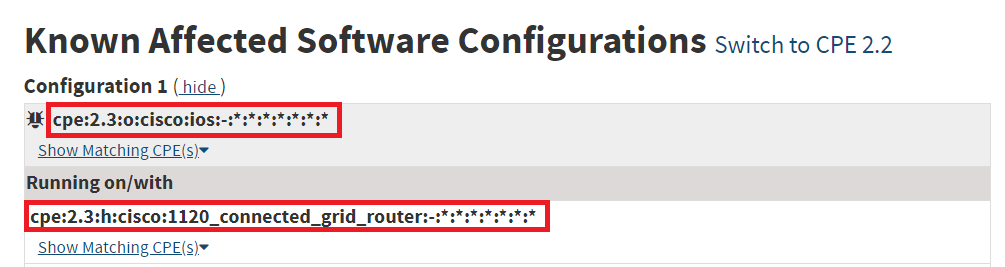
For network devices, the "Known Affected Software Configurations" in the NVD defines the CPE for the OS (o), not the hardware (h).
If you wish to manage network device vulnerabilities in FutureVuls, please register the OS CPE definition.
About CPE format on NVD
The "Known Affected Software Configurations" section on an NVD CVE page indicates the software versions affected by that vulnerability. The versions listed here are confirmed to have the vulnerability. Users and system administrators can use this information to determine if their systems are affected.
On the other hand, "Running on/with" indicates whether the vulnerable software is affected when it is running on a specific operating system, other software, or hardware. For example, if "cpe:2.3:h:cisco:catalyst_ie9300:-:*:*:*:*:*:*:*" is listed under "Running on/with," it indicates that the vulnerability may affect software running on the "Cisco Catalyst IE9300".
Detecting vulnerabilities for "cpe:2.3:h:cisco:1120_connected_grid_router:-:::::::*"#
As an example, let's consider the case where you want to detect vulnerabilities for the "network device" represented by the following CPE.
- Version 2.2: `cpe:/h:cisco:1120_connected_grid_router:-`
- Version 2.3: `cpe:2.3:h:cisco:1120_connected_grid_router:-:*:*:*:*:*:*:*`
When the CPE part type is h, you can find the corresponding o information using the following steps.
-
Search for vulnerabilities associated with the corresponding CPE
-
Select a Vuln ID to check the OS CPE associated with the hardware CPE
-
Register the OS CPE in FutureVuls