Application Scan#
FutureVuls can detect and manage vulnerabilities not only in OS packages but also in application-dependent libraries. Many vulnerabilities in dependent libraries do not have a CVE ID assigned, but FutureVuls can detect these non-CVE vulnerabilities as well.
There are several detection methods, each with different scannable types and detection capabilities. We recommend trying them out to select one or a combination of methods for detection. The characteristics of each detection method are described in "Scan Method Options and Features".
Lockfile Paste Scan#
This method involves pasting the contents of a Lockfile into your browser to perform a scan.
When a vulnerability affecting a registered Lockfile is disclosed, FutureVuls detects it, automatically creates a task, and notifies the user. If you upgrade a dependent library and the Lockfile's content is updated, please update the Lockfile content on the FutureVuls screen. The status of the detected task in FutureVuls will automatically be updated to "patch_applied".
For scannable Lockfiles and binaries, please refer to "Supported Environments".
Here is how to register a Lockfile from the FutureVuls screen.
-
Select a server and click "Add lockfile" in the Application tab.
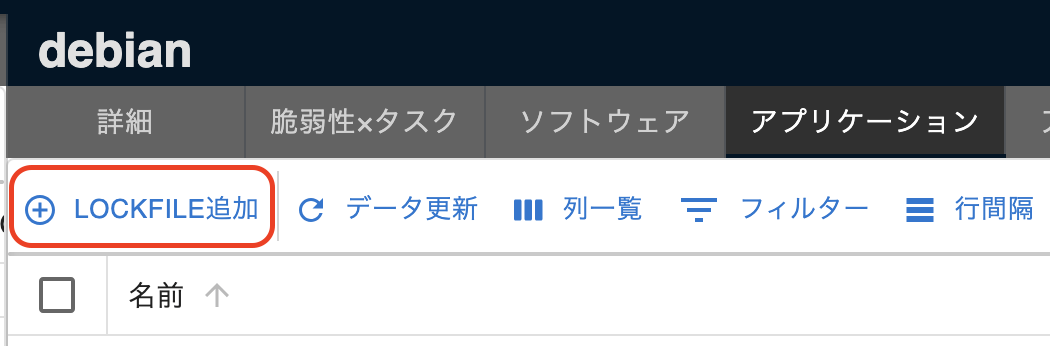
-
In the "Add Application Library" dialog, name the Lockfile, select its type, register the Lockfile's content, and submit.
Register the Lockfile's content using one of the following tabs:
- Upload File: Upload the Lockfile from "Select File". - Paste Import: Paste the Lockfile's content into "File Content".
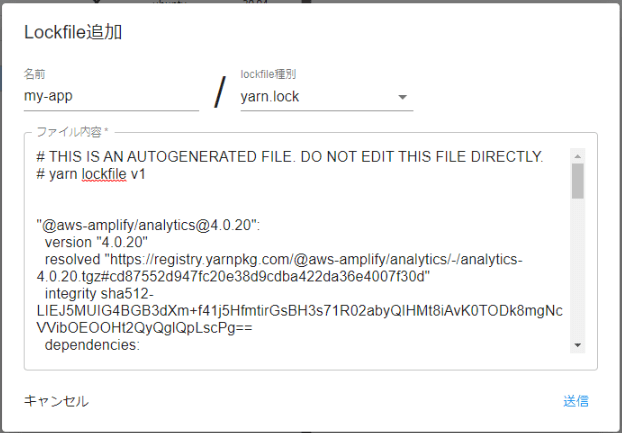
Under "Include devDependencies", choose whether to include development dependencies (devDependencies) in the scan from the following three options:
- Include in the target: Development dependencies are also included in the scan, based on the determination criteria for each lockfile format. - Do not include in the target: Development dependencies are excluded from the scan. - Not set (Follow server settings): Follows the "Scan including devDependencies" setting in the server details (default).
For the criteria for identifying dev dependencies for each lockfile, please refer to "Supported Environments".
-
Software will be registered and vulnerabilities detected during the next scan.
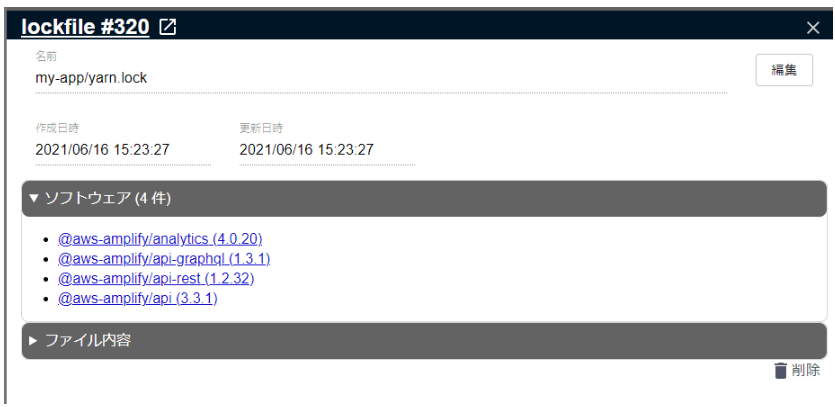
About Development Dependencies (devDependencies)
In the Lockfile Paste Scan, development dependencies are excluded from detection when "Scan including devDependencies" in the server details is disabled (unless "Include in the target" is selected for the Lockfile). If you wish to include development dependencies in the scan, select "Include in the target" under "Include devDependencies" when adding the Lockfile, or enable "Scan including devDependencies" in the server details.
Software derived from development dependencies will display a [DevDependency] badge in the software list, allowing you to distinguish it from production dependencies.
Application SBOM Import#
This method involves pasting the contents of an SBOM file into your browser to perform a scan.
Similar to the Lockfile Paste Scan, you can register dependent libraries contained in an SBOM with FutureVuls. Applications and libraries included in the SBOM are registered at the same time the SBOM is added, and vulnerabilities will be detected during the next scan.
- Supported SBOM tools are listed "here".
- For supported dependent libraries, please refer to "Application SBOM Import".
- Application SBOM files registered before the "2024-10-16 release" will be integrated into the server's SBOM file only if the server type is SBOM.
For details on how to register an application's SBOM from the FutureVuls console, please refer to the link below.
*If you have trouble adding an SBOM, please refer to the "Dependency Library Scan FAQ".
Scan a path on the filesystem using Trivy#
"aquasecurity/trivy" is an OSS tool capable of detecting vulnerabilities in application-dependent libraries. It can automatically detect application-dependent libraries stored under a specified directory and scan them for vulnerabilities. FutureVuls can import Trivy scan results, allowing you to manage application library vulnerabilities on FutureVuls.
We recommend specifying the path as an absolute path.
Trivy scans for vulnerabilities based on various language Lockfiles and binaries like jar files. For details on supported languages and package ecosystems, please refer to the Filesystem and Rootfs columns in "Trivy Supported languages".
For application library scanning with Trivy, the following two patterns are available:
Install Trivy in a local environment to scan#
Install Trivy in a local environment and upload the results of the application library scan to FutureVuls. This method offers two installation modes: standard and lightweight. The differences are as follows:
| Item | Description | Standard | Lightweight |
|---|---|---|---|
| root privileges | Whether root privileges are required for installation | Required | Not required |
| Supported Environments | Environments where setup is possible | Reference | General Linux |
| Scheduled Scan | Whether to automatically and periodically scan application libraries | Supported | Not supported |
The lightweight version does not require root privileges, but you must manually perform periodic scans of the application libraries. Also, it must be run by a user with read permissions for all directories and files under the specified directory path. To keep vulnerability information up-to-date by continuously syncing dependency library changes with FutureVuls, we generally recommend using the standard version scan if both modes are available.
Scan new dependent libraries#
To scan a new application library and register it with FutureVuls, follow these steps.
-
From the
Add Serverbutton on the Server tab, open the dialog and selectScan Libraries on File System.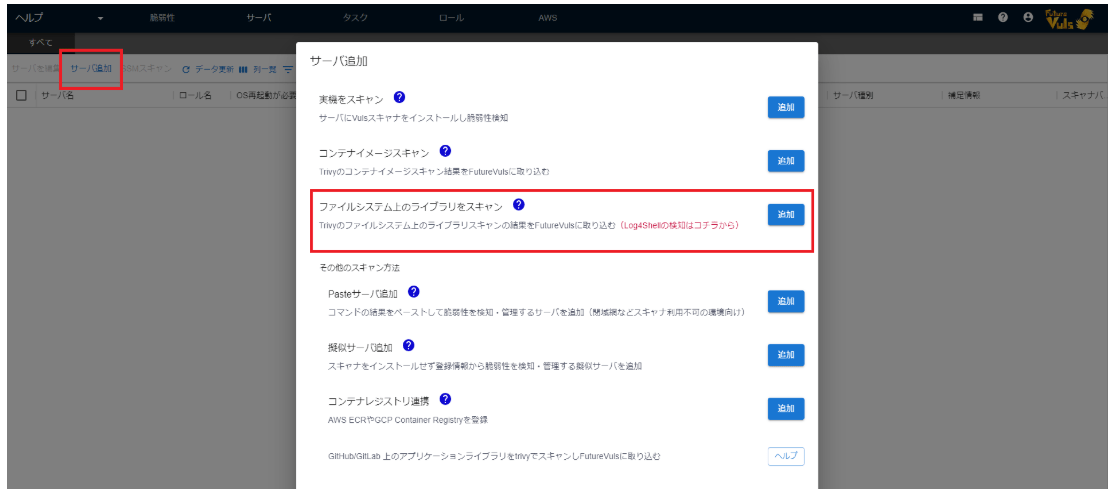
-
Select a Scanner Token and enter the absolute path of the directory to be scanned.
If no path is specified, the root directory will be automatically selected, and all application libraries on the filesystem will be scanned.
-
If you are behind a proxy, enter the proxy server to use.
- If you are using the lightweight version, turn on the switch.
- Copy the command displayed at the bottom of the screen, paste it into the local environment where the target application library is managed, and execute it.
- Confirm that the scanned directory has been added to the Server tab of the target group in FutureVuls.
For the standard version, it may take 5-10 minutes to appear in FutureVuls. If you want to run a scan immediately after installation, execute the following command:
/opt/vuls-trivy-saas/vuls-trivy-saas.sh &> /opt/vuls-trivy-saas/vuls-trivy.log
The registration is now complete. If you are using the standard version, the scanner will start automatically once a day to scan the target directory and sync the results with FutureVuls.
In the standard version, you can manually add scan options for target container images/libraries, etc., to config.toml.
For details, see "Scanner Behavior Settings". Also, if the scan results do not appear, please refer to "This article".
Update configuration information for registered libraries#
- Update vulnerability information based on registered configuration information
If you want to update vulnerability information based on the configuration of application libraries already registered in FutureVuls, please "run a manual scan" from FutureVuls.
- Reflect changes in application library configuration information in FutureVuls
If there are changes to the registered dependent libraries, follow these steps to sync them with FutureVuls.
- For the standard version:
- No action is required as the scanner starts automatically once a day to scan the libraries.
- If you want to start the scanner immediately, execute the following command as the
rootuser or thevuls-trivy-saasuser:/opt/vuls-trivy-saas/vuls-trivy-saas.sh &> /opt/vuls-trivy-saas/vuls-trivy.log
-
For the lightweight version:
- Click on the target server in the Server tab to open the server details page.
-
Click the
Update Configuration Informationbutton to open the dialog.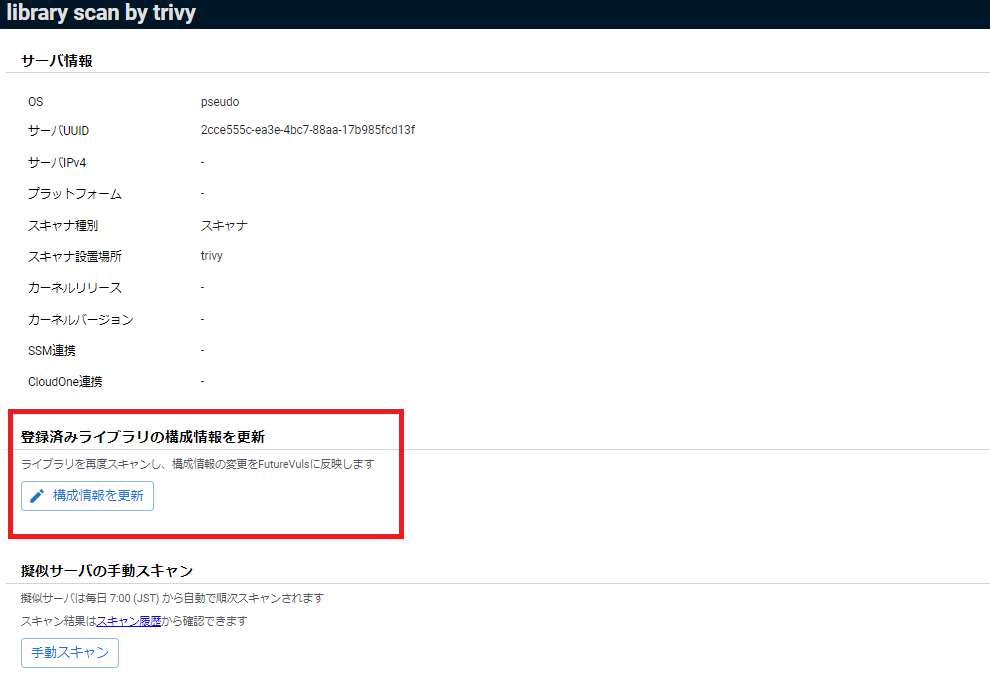
-
Select a Scanner Token and enter the absolute path of the directory to be scanned.
- If you are behind a proxy, enter the proxy server to use.
- Copy the command displayed at the bottom of the screen, paste it into the local environment where the target application library is managed, and execute it.
How to configure a Trivy scan#
The configuration methods for Trivy scans are described together in "Scanner Behavior Settings". If you wish to manually add libraries to be scanned, please refer to this page.
Scan for library vulnerabilities on git push#
Upload the results of an application library scan to FutureVuls on each Git push. This document uses GitHub Actions as an example. A sample YAML file for GitHub Actions is as follows.
- Environment variables used in the sample
| Variable | Description | Required |
|---|---|---|
| VULS_SAAS_GROUPID | The ID of the group to upload scan results to | ✅ |
| VULS_SAAS_TOKEN | A token with scan permissions | ✅ |
| TARGET_LIBRARY | The path of the directory to be scanned If targeting the entire repository, ${{ github.workspace }} is fine |
✅ |
| VULS_SAAS_UUID | A UUID for management in FutureVuls For new registrations, specify a value generated by a command like uuidgen |
✅ |
| ACTIONS_RUNTIME_TOKEN | The GitHub token for authentication Required if a RATELIMIT error occurs |
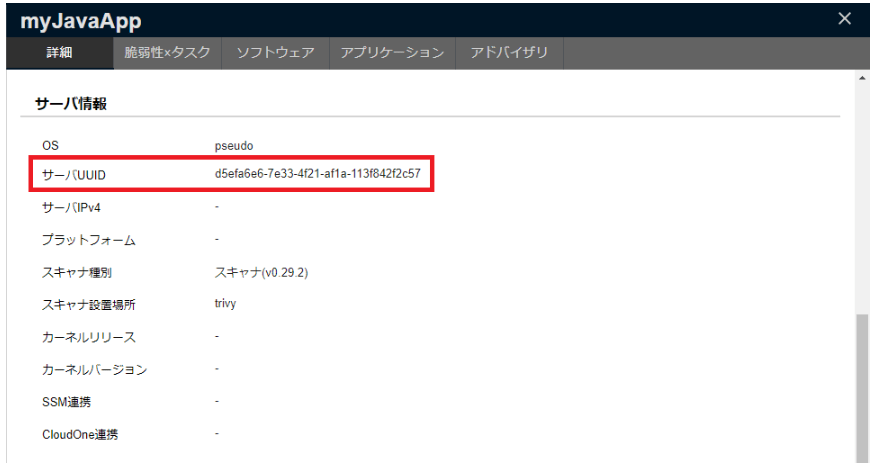
- If you are updating the configuration information of a library already managed in FutureVuls, specify the UUID of the target library as
VULS_SAAS_UUID.
We recommend setting the following environment variables using "encrypted secrets".
- VULS_SAAS_GROUPID
- VULS_SAAS_TOKEN
Using this information would allow anyone to upload scan results for any server to the specified group in FutureVuls.
Scan using a script file for scanning.
name: FutureVuls library Scan
on:
  push:
defaults:
  run:
      shell: bash
jobs:
  docker-test:
    name: FutureVuls library Scan
    env:
      VULS_SAAS_GROUPID: ${{ secrets.VULS_SAAS_GROUPID }}
      VULS_SAAS_TOKEN: ${{ secrets.VULS_SAAS_TOKEN }}
      TARGET_LIBRARY: "${{ github.workspace }}"
      VULS_SAAS_UUID: "xxxx"
      ACTIONS_RUNTIME_TOKEN: ${{ secrets.GITHUB_TOKEN }}
    runs-on: ubuntu-latest
    steps:
    - uses: actions/checkout@v4
    - name: cached scan db
      uses: actions/cache@v3
      with:
        path: vulndb/
        key: trivy-vulndb
    - name: scan and upload
      run:
        curl -s https://installer.vuls.biz/vuls-trivy-light.sh | bash -s inst
Note: Trivy scans do not include development dependency packages#
The scanner (Trivy), by default, excludes development dependencies from detection, and FutureVuls follows this behavior when using Trivy scans. Therefore, libraries not used in the production environment will not be displayed in the scan results (e.g., "dev": true in package-lock.json, the packages-dev section in composer.lock, etc.).
After scanning and registering a server, you can enable scanning for development dependencies from the server details screen. When enabled, development dependencies will be included starting from the next scan. Software derived from development dependencies will display a [DevDependency] badge. For the criteria for identifying dev dependencies for each lockfile and the enhanced dev identification that Trivy performs by reading surrounding files on the filesystem, please refer to "Supported Environments".
Note on initial scan
You cannot configure development dependencies during the initial scan. Please run the scan first to register the server, and then enable the setting from the server details screen.
About scanner version
To retrieve development dependencies with a Trivy scan, please use scanner version v0.38.0 or higher.
For the detection specifications of each language's lockfile in Trivy, please refer to the documentation for each language under Trivy official documentation > Language Libraries page.
How to automatically update Lockfiles on Push with GitHub Actions#
This section explains how to use "futurevuls/fvuls-lockfile-uploader" to update a Lockfile registered in FutureVuls through the REST API only when the Lockfile changes on git push. If a Lockfile with the same path is already registered on the server, the action updates it; otherwise, it registers a new one.
The sample below runs when a push to the release branch modifies go.mod or web/yarn.lock, and then uploads both Lockfiles. Write the paths: patterns without a leading ./.
Please set the following environment variables in the sample using "Encrypted Secrets". Pass them only in the env: of the steps that run this action so that other actions in the same job cannot read the token.
| Environment Variable Name | How to check |
|---|---|
| FVULS_SERVER_UUID | Check from "Server List" |
| FVULS_TOKEN | Check from "Group Settings > FutureVuls API" |
In with:, specify the path to the Lockfile, relative to the repository root, in path and the string to prepend to the path registered in FutureVuls in repoName. The registered path depends on repoName as follows.
| repoName | path | Registered Path |
|---|---|---|
| (not specified) | ./go.mod |
go.mod |
owner/repo |
./web/yarn.lock |
owner/repo/web/yarn.lock |
on:
  push:
    ## https://docs.github.com/en/actions/learn-github-actions/workflow-syntax-for-github-actions#onpushpull_requestpaths
    paths:
      - 'go.mod'
      - 'web/yarn.lock'
    branches:
      - release

name: Check lockfiles

permissions:
  contents: read

jobs:
  build:
    name: Upload lockfile
    runs-on: ubuntu-26.04
    steps:
      - uses: actions/checkout@3d3c42e5aac5ba805825da76410c181273ba90b1 # v7.0.1
      - name: Upload go.mod
        uses: futurevuls/fvuls-lockfile-uploader@9245e71ad5a5833acf0196650027fc4a6be78921 # v2
        env:
          FVULS_SERVER_UUID: ${{ secrets.FVULS_SERVER_UUID }}
          FVULS_TOKEN: ${{ secrets.FVULS_TOKEN }}
        with:
          repoName: ${{ github.repository }}
          path: './go.mod'
      - name: Upload web/yarn.lock
        uses: futurevuls/fvuls-lockfile-uploader@9245e71ad5a5833acf0196650027fc4a6be78921 # v2
        env:
          FVULS_SERVER_UUID: ${{ secrets.FVULS_SERVER_UUID }}
          FVULS_TOKEN: ${{ secrets.FVULS_TOKEN }}
        with:
          repoName: ${{ github.repository }}
          path: './web/yarn.lock'
Scan libraries on a remote repository with trivy#
By integrating with trivy's repository scan, you can detect vulnerabilities in language libraries on GitHub/GitLab and manage them on FutureVuls. This allows you to use library scanning even if the target library files do not exist in the local environment where trivy is installed.
Please note that fewer languages are supported compared to "Trivy scan for libraries on a local filesystem".
For details on supported languages and package ecosystems, please refer to the Repository column in "Trivy Supported languages".
Scan Method#
New Registration#
Install the following three tools according to your work environment.
| tools | releases |
|---|---|
| trivy | https://github.com/aquasecurity/trivy/releases/ |
| trivy-to-vuls | https://github.com/future-architect/vuls/releases |
| future-vuls | https://github.com/future-architect/vuls/releases |
Installation command examples
Install trivy
curl -s https://api.github.com/repos/aquasecurity/trivy/releases/latest | \
grep "browser_download_url.*_Linux-64bit.tar.gz" | \
cut -d : -f 2-3 | \
xargs wget
tar zxvf trivy_*.tar.gz
Install trivy-to-vuls
curl -s https://api.github.com/repos/future-architect/vuls/releases/latest | \
grep "browser_download_url.*trivy-to-vuls.*_linux_amd64.tar.gz" | \
cut -d : -f 2-3 | \
xargs wget
tar zxvf trivy-to-vuls*.tar.gz
Install future-vuls
curl -s https://api.github.com/repos/future-architect/vuls/releases/latest | \
grep "browser_download_url.*future-vuls.*_linux_amd64.tar.gz" | \
cut -d : -f 2-3 | \
xargs wget
tar zxvf future-vuls*.tar.gz
Install trivy
curl -s https://api.github.com/repos/aquasecurity/trivy/releases/latest | \
grep "browser_download_url.*_macOS-ARM64.tar.gz" | \
cut -d : -f 2-3 | \
xargs wget
tar zxvf trivy_*.tar.gz
Install trivy-to-vuls
curl -s https://api.github.com/repos/future-architect/vuls/releases/latest | \
grep "browser_download_url.*trivy-to-vuls.*_darwin_arm64.tar.gz" | \
cut -d : -f 2-3 | \
xargs wget
tar zxvf trivy-to-vuls*.tar.gz
Install future-vuls
curl -s https://api.github.com/repos/future-architect/vuls/releases/latest | \
grep "browser_download_url.*future-vuls.*_darwin_arm64.tar.gz" | \
cut -d : -f 2-3 | \
xargs wget
tar zxvf future-vuls*.tar.gz
Next, set the following environment variables.
export FVULS_GROUP_ID=xxx
export FVULS_TOKEN=xxx
export FVULS_SERVER_UUID=`uuidgen`
export REPOSITORY_URL=https://xxx.xxxxx/xxx
# If in a proxy environment, set the proxy server to use
export https_proxy=http://name:pass@proxy:port

# Select the variable to set depending on the repository to be scanned
export GITHUB_TOKEN=xxxxxxxx
export GITLAB_TOKEN=xxxxxxxx
| Environment Variable | Description | Details |
|---|---|---|
| FVULS_GROUP_ID | Group ID | Open group settings and check from the URL.https://console.vuls.biz/org/xxx/group/[here]/setting/profile |
| FVULS_TOKEN | Token | Open group settings > tokens and select a token with scan permissions. |
| FVULS_SERVER_UUID | UUID | Create one arbitrarily using a command like uuidgen. It is used to identify the server on FutureVuls. |
| REPOSITORY_URL | Repository URL | The URL of the repository to be scanned |
| GITHUB_TOKEN | GitHub Token | A GitHub token with read permissions for the repository to be scanned |
| GITLAB_TOKEN | GitLab Token | A GitLab token with read permissions for the repository to be scanned |
Token settings
If both GITHUB_TOKEN and GITLAB_TOKEN are set, GITHUB_TOKEN will always be used as the authentication token. Therefore, if you are scanning a repository on GitLab, please remove GITHUB_TOKEN from the environment variables.
Finally, scan the repository and upload to FutureVuls.
./trivy repo -q -f json --list-all-pkgs ${REPOSITORY_URL} | \
./trivy-to-vuls parse --stdin | \
./future-vuls upload --stdin --group-id ${FVULS_GROUP_ID} --token ${FVULS_TOKEN} --uuid ${FVULS_SERVER_UUID}
When you open FutureVuls, you can confirm that a new server has been registered and vulnerabilities in the language libraries have been detected.
Updating library files#
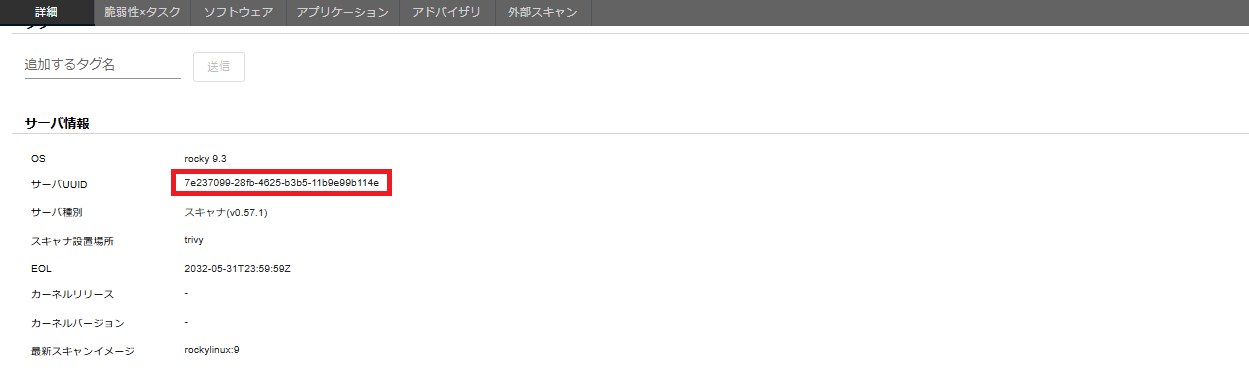
To update a library that has already been registered once, set the UUID of the target server in the environment variable FVULS_SERVER_UUID before scanning and uploading.
# Installation of trivy, trivy-to-vuls, future-vuls is omitted

export FVULS_GROUP_ID=xxx
export FVULS_TOKEN=xxx
export FVULS_SERVER_UUID=xxx
export REPOSITORY_URL=https://xxx.xxxxx/xxx

# Select the variable to set depending on the repository to be scanned
export GITHUB_TOKEN=xxxxxxxx
export GITLAB_TOKEN=xxxxxxxx

./trivy repo -q -f json -o ./results.json --list-all-pkgs ${REPOSITORY_URL}
./trivy-to-vuls parse ./ -f result.json | \
./future-vuls upload --stdin --group-id ${FVULS_GROUP_ID} --token ${FVULS_TOKEN}  --uuid ${FVULS_SERVER_UUID}
Scan by specifying a Lockfile with Vuls Scanner#
This method scans for dependent library vulnerabilities by specifying the path to a Lockfile or binary placed on the server.
For scannable Lockfiles and binaries, please refer to "Supported Environments".
This feature supports both local scan mode and remote scan mode.
It supports both Linux and Windows servers. Support for Windows servers was added in the release on July 14, 2025. For details, please see "Windows Local Scan - Lockfile Scan".
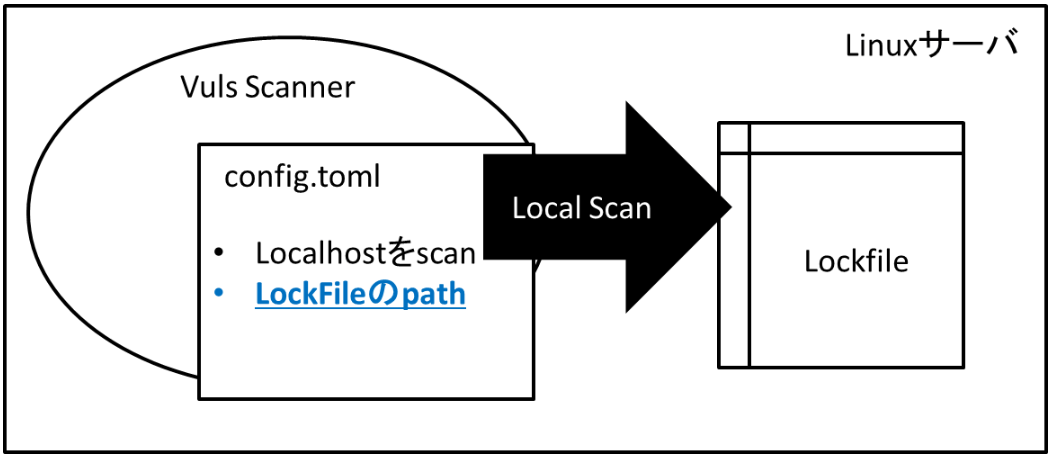
How Vuls local scan mode works#
Specify the path of the target Lockfile in config.toml. During the scan, it analyzes the Lockfile at the specified path to obtain a list of dependent libraries.
How Vuls remote scan mode works#
Specify the path of the Lockfile on the target server in config.toml. During the scan, it connects to the remote server via SSH, analyzes the Lockfile at the specified path, and obtains a list of dependent libraries.
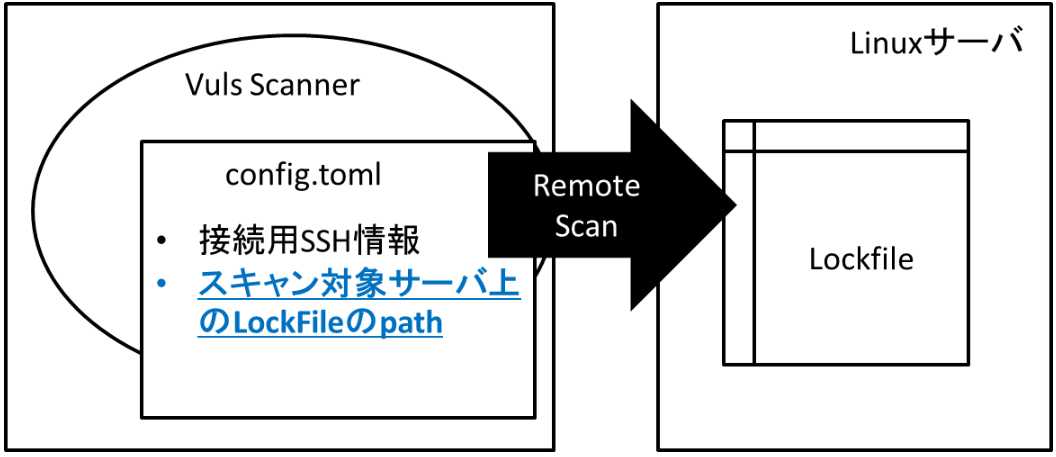
Configuration Method#
Specify the path of the Lockfile in /opt/vuls-saas/config.toml (Linux) or C:\Program Files\vuls-saas\config.toml (Windows).
[servers]

[servers.sample]
user = "vuls-saas"
host = "localhost"
port = "local"
lockfiles = [
  "/home/user/lockfiles/package-lock.json",
  "/home/user/lockfiles/Gemfile.lock",
  "/home/user/lockfiles/yarn.lock"
]
Example for Windows:
[servers]

[servers.sample]
host = "localhost"
port = "local"
lockfiles = [
  "C:\\Projects\\myapp\\package-lock.json",
  "C:\\Projects\\myapp\\Gemfile.lock",
  "C:\\Projects\\myapp\\yarn.lock"
]
Also, by specifying findLock = true and findLockDirs in config.toml, you can automatically search for Lockfiles, Jars, etc., under the findLockDir on the target server.
If you specify "findLock = true without specifying findLockDirs," it will search for Lockfiles in all directories under the root. In this case, it may monopolize one CPU core while the search command is running.
If this is not acceptable, we recommend specifying the target directories for automatic search using findLockDirs.
# Example for Linux
[servers]

[servers.sample]
user = "vuls-saas"
host = "localhost"
port = "local"
findLock = true
findLockDirs = [
  "/path/to/project1/lib",
  "/path/to/project2/lib",
]
# Example for Windows
[servers]

[servers.sample]
host = "localhost"
port = "local"
findLock = true
findLockDirs = [
  "C:\\Projects\\project1\\lib",
  "C:\\Projects\\project2\\lib",
]
After scanning, the packages will be displayed in the software and task lists, just like OS packages.
GitHub Security Alerts Integration#
"GitHub Security Alerts" is a GitHub feature that scans for vulnerabilities in dependent libraries listed in a repository's Lockfile. FutureVuls can integrate with GitHub via API to import vulnerabilities detected by GitHub into FutureVuls.
Even if you do not manage your source code on GitHub, you can still detect vulnerabilities by managing only the Lockfile on GitHub.
For supported languages and types, please refer to "GitHub: Supported package ecosystems".
Scan AWS Lambda dependent libraries#
By using the "Amazon Inspector AWS Lambda function scanning feature", you can import and manage vulnerabilities in AWS Lambda's dependent libraries in FutureVuls.
For the benefits of integrating Amazon Inspector with FutureVuls, please refer to the blog post below.
For details on how to integrate, please refer to "here".
How to register CPEs on the FutureVuls console#
This is a method to scan for library vulnerabilities by "registering CPEs from the FutureVuls screen". Since the information sources for CPE-based scans are NVD and JVN, library vulnerabilities not registered in NVD or JVN cannot be detected. Also, you must register the libraries that the target library depends on, so it is usually better to use other methods.