Preview
This guide is a preview. Its content may change.
Register Libraries and Commercial Products#
Read Only the Method You Use
Manage software other than OS packages. This page covers two categories separately: language libraries used by your applications (npm, pip, gem, Maven, and so on), and commercial products and middleware installed outside package management (Oracle, JP1, a downloaded Tomcat, and so on). For network devices, see Register Network Devices.
Application Dependency Libraries#
The method depends on where you can get the library information from. You can also combine multiple methods.
| Where the information comes from | Method | Updates |
|---|---|---|
| You use a CI/CD tool | CI/CD integration with Docker Scan (Trivy): Dependency libraries are registered automatically with every build | Automatic |
| There is a lockfile on the server | ☆Local Scan (specifying the lockfile): Write the lockfile path in the scanner's configuration file. The contents of the lockfile are analyzed | Automatic |
| You only have the lockfile at hand | Lockfile Paste Scan: No scanner is needed. Paste the contents of the lockfile into the screen | Manual |
| You generate SBOMs in your build pipeline | SBOM Import (SBOM Import). We recommend that components have PURLs (components with neither a PURL nor a CPE are not detected until you assign one). This assumes you keep the SBOM updated | Manual |
| Your source code is managed on GitHub | GitHub Integration: Imports the findings of GitHub security alerts | Automatic |
| It runs on AWS (EC2, Lambda) | Amazon Inspector Integration (Amazon Inspector Integration) | Automatic |
Libraries are identified by library name and version (PURL) to detect vulnerabilities. To update lockfiles automatically with GitHub Actions, use v2 of fvuls-lockfile-uploader (Integrating into a CI/CD Pipeline). Libraries bundled with C/C++ source code can be identified with a dedicated tool (C/C++ Library Identification). For how to specify lockfiles, see Application Scan; for GitHub Integration, see GitHub Integration; and for supported languages, see Supported Environments.
Commercial Products and Middleware (CPE Registration)#
A CPE is a name tag that represents a product and version in a globally standardized format (for example, cpe:/a:apache:http_server:2.4.54). When you assign a CPE to software, vulnerabilities can be detected by matching it against vulnerability databases (NVD, JVN, and so on).
What CPE Registration Is and Isn't Suited For#
| Suited for | Not suited for (use a different method) |
|---|---|
| Software installed outside OS package management, such as software built from source, installed with an installer, or placed manually | OS packages (rpm, deb, apk) → Use Local Scan, Remote Scan, or Paste Scan. Detecting them by CPE produces many false positives |
| Commercial middleware and appliances such as Oracle Database and JP1 | Language libraries (npm, Maven, PyPI, and so on) → Use Application Scan or SBOM Import (detection by PURL) |
For third-party products on Windows, you can assign CPEs automatically by using "CPE Auto Assignment" in Group Settings.
What to Prepare Before Registering#
- The product name and vendor name
- The exact version (for example, 2.4.54; "2.4.x" is not enough)
- The server to register it on (an existing server or a pseudo server for management)
To be sure, check the NVD CPE search page in advance to confirm that a CPE exists for the product. When you assign CPEs to several items at once with the "Assign CPE" button in the software list, a link to the NVD search page is also shown for each candidate.
Steps#
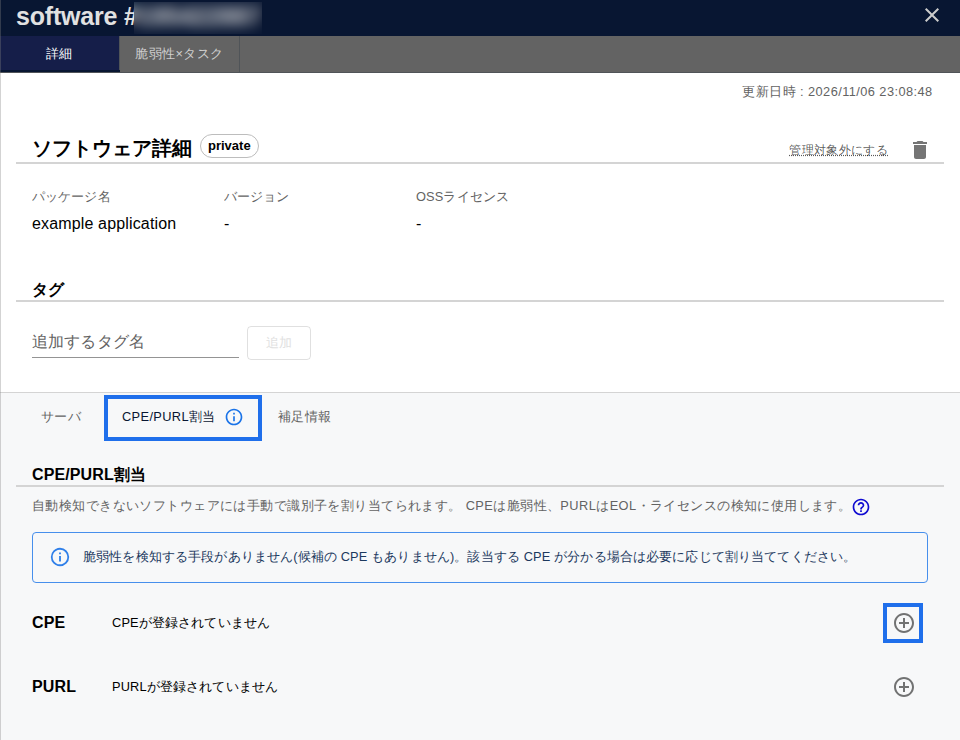
- Choose how to register - To add software that isn't in the list yet: On the "Software" tab of the server details, click "Import Software". In the dialog that opens, select the product name and version, or enter the CPE string directly, to register it. Then go to step 4. - To assign a CPE to software that is in the list but shows no vulnerabilities: On the "Software" tab, click the target software, open "Assign CPE/PURL", and go to step 2.
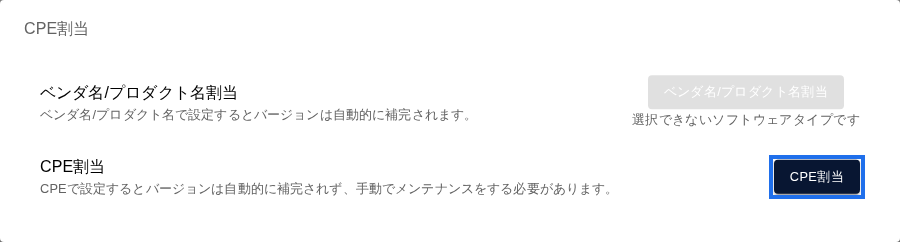
- Choose how to assign: Click ⊕ in the CPE row to choose between "Assign by vendor/product name" and "Assign CPE". - Assign by vendor/product name: You choose only the vendor and product. The version is filled in automatically from the software's version. It may not be available for some software types. - Assign CPE: You set everything, including the version. When you upgrade the software, you also need to update the CPE yourself. - If the CPE row says a CPE will be assigned automatically based on the verified dictionary, automatic assignment is on. To assign one manually, turn it off with the icon on the right, then click ⊕.
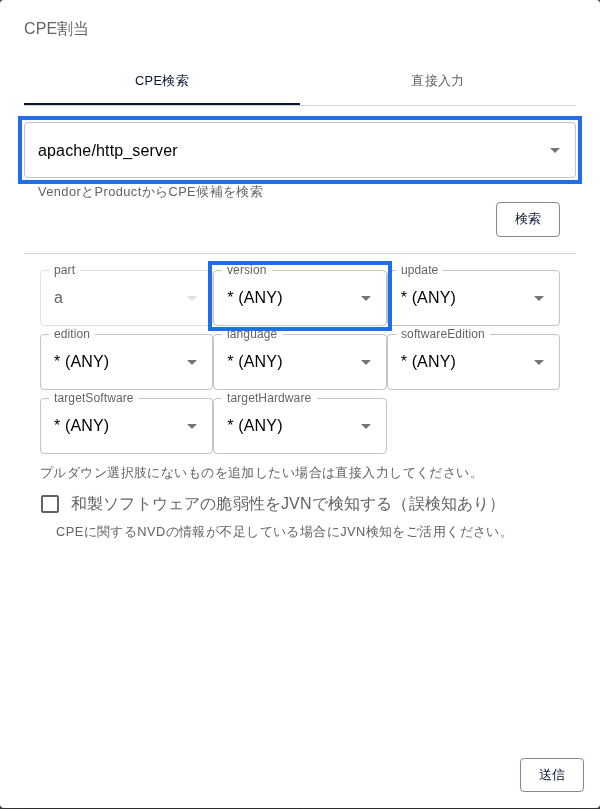
- Find the product and select the version (for Assign CPE): On the "CPE Search" tab, enter the vendor/product and click "Search". Select the exact installed version in "version" and click "Submit". Leaving it as "* (ANY)" increases false positives. If you know the CPE string, enter it on the "Direct Input" tab.
- Check with a manual scan: A registered CPE is not matched until the next scan. Run a manual scan once, and confirm that the vulnerabilities associated with the CPE appear in the list.
To register multiple items at once, you can also use bulk text registration, CSV (product name,version,vendor name), OWASP Dependency-Check XML, or the API.
Good to Know for Operations#
- When you upgrade, update the CPE as well: CPEs don't change automatically. If the CPE is outdated, vulnerabilities you should have fixed keep appearing.
- If a "deprecated CPE" warning appears, update the CPE: This is a CPE that has become an outdated format in NVD. If you leave it as is, new vulnerabilities will no longer be detected.
- Removing a CPE also deletes its associated vulnerabilities and tasks: When you unassign it, the information detected with that CPE is deleted.
- Use "Detect vulnerabilities in Japanese software with JVN" only for Japanese software: Use it only for Japanese software that has no information in NVD. Because it detects by product name regardless of version, false positives increase.
In the "Vulnerability Detection" column of the software list, you can find software shown as "CPE required" or "Review CPE". For what each display means and what to do, see Vulnerability Detection Column.
Common Issues#
| Symptom | Cause and solution |
|---|---|
| Too many detections | Check whether the version is specified as "* (ANY)" or as something like "2.4.x" |
| Vulnerabilities that used to appear no longer appear | The October 2026 release removed approximate matching (fuzzy matching) for cases where versions can't be compared strictly, reducing false positives. Register the exact version that is actually installed. In addition, versions containing letters, such as OpenSSL 1.1.1n, are now matched correctly |
| Too few detections, or none at all | Check whether you ran a manual scan, whether NVD has information for that CPE, and whether the vendor name is spelled correctly |
Troubleshooting#
If something isn't working, see Troubleshooting (FAQ).
If that doesn't solve the problem, contact us through the support contact form. Including the target product name and version, the CPE you assigned, and the detection results you expect helps us investigate faster.
Learn More#
Next Page#
When registration is complete, check your progress in the "After You Register All Servers in the Initial Scope" section of Setup 2: Register Servers and Products.