Preview
This guide is a preview. Its content may change.
STEP 2: Decide Who Fixes What and by When#
For Everyone
Set assignees and due dates for the vulnerabilities you decided to address in STEP 1. Assignees receive a notification, so you don't need to send them a separate request.
What Is a Task?#
In FutureVuls, you manage your response in units called "tasks". A task is a ticket for managing the response (assignee, due date, and status) to a vulnerability found on a server. When a vulnerability is found, one task is created for each server it's found on. Even for the same vulnerability, a separate task is created for each server where it's found. Tasks are created automatically by scans, so you don't need to create them by hand.
flowchart LR
    X["Vulnerability X is found"] --> A["Server A (has vulnerability X)"]
    X --> B["Server B (has vulnerability X)"]
    A --> T1["Task 1<br>Server A × vulnerability X"]
    B --> T2["Task 2<br>Server B × vulnerability X"]
A task contains information that scans fill in automatically and information that you decide and enter as part of your operations. In STEP 2, you enter the "Assignee" and "Due date" on the right side.
| Filled in automatically by scans | Details | Decided and entered by you | Details |
|---|---|---|---|
| Target | Which vulnerability on which server | Assignee | Who will fix it |
| Severity | Assessment of whether it needs to be fixed urgently | Due date | When it needs to be fixed by |
| Patch | Whether a fixed version has already been released | Status | How far the work has progressed (updated in STEP 3) |
Initial Setup for Assignees, Due Dates, and Notifications#
You set up automatic assignment of assignees, automatic due dates, and notifications to Slack or Teams only once, at the start. If you haven't done so yet, first complete Setup 4: Set Assignees, Due Dates, and Notifications.
How to Assign Tasks Each Day#
For tasks that didn't get an assignee automatically, or tasks whose assignee or due date you want to change, update them in bulk with the following steps.
- In the vulnerability list, select the checkbox on the row of each vulnerability (CVE) you've decided to address. You can select more than one.
- Click "Update Related Tasks". The tasks on all servers related to the selected vulnerabilities are updated together.
- Enter the assignee and due date, and update.
- The assignees receive a notification.
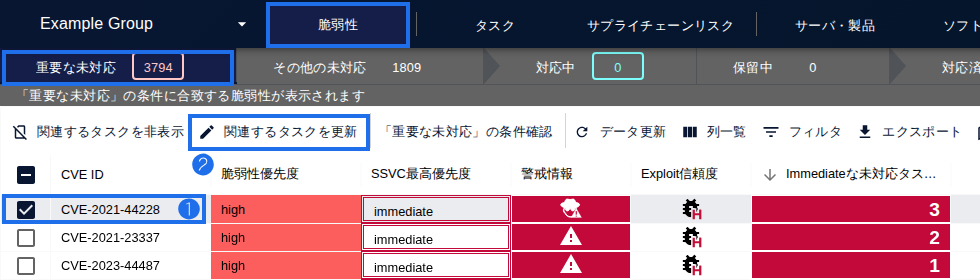
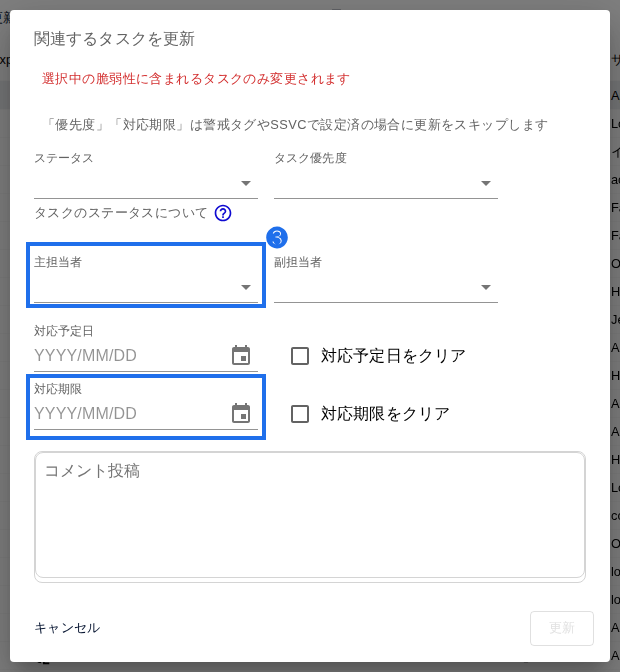
With this method, tasks that already have an assignee or due date are also changed to what you enter. However, "Priority" and "Due Date" are not updated if they have already been set by an alert tag or SSVC (this is also shown on the update screen). To update only tasks without an assignee, select the rows of the target tasks in the list on the Tasks tab, then choose "Apply to selected rows" from "Update Tasks" (Update Tasks).
Common Issues#
| Symptom | Cause and solution |
|---|---|
| Notification emails don't reach a specific user | If emails from FutureVuls bounce back without being delivered, that user is automatically restricted so they can only view the profile screen. After confirming that the registered email address is correct, log in, open "User Settings > Profile", and click "Verify email address" in the Email Address section. Enter the verification code you receive to restore access. You can restore access only if you can receive the verification code email. If you log in with Google authentication or SAML, you can't complete this verification. Log in with a password and then do it (Email Address Verification, "Disable Users Whose Email Addresses Have Become Invalid") |
| Notification emails don't arrive | Check that the notification email address is correct and that the emails aren't being filtered as spam ("Notification Emails Don't Arrive") |
Troubleshooting#
- Notification emails don't arrive: When Notification Emails Do Not Arrive
- Not sure how to handle statuses or due dates: Managing Tasks (Statuses and Due Dates)
If that doesn't solve the problem, contact us through the support contact form.
Learn More#
Next Page#
Record the results of the work your assignees completed. Go to STEP 3: Record the Results.